Thursday, September 26, 2013

Easy Digital Inchies

Happy Thursday!

The Scrap Rap, Club Scrap’s monthly newsletter, has always been a major source of inspiration, but lately, the ideas have been over-the-top! Saturday morning I had a chance to look at the latest version of this month’s Rap. It was updated on Friday to include the Club Stamp kit. And that card on page 13 really grabbed my attention. I’ve been a fan of ‘inchie’ art for a while now and loved the idea of doing a simple inchie using patterned paper.

Hey, wait a minute, can we do this digitally? You betchya!

Here’s how . . .

1. Create a 1.25 inch by 1.25 inch, 300 ppi document with a White Background.

2. Select the Marquee tool and use the top tool bar to choose a ‘fixed size’ style and set the height and width to one inch.


3. Open one of the Take Wing Digital background files.

4. Click on one of the background files. You’ll see marching ants outlining a 1" square.


5. Select the Arrow tool (also known as the Move Tool) and drag the 1 inch square to the card layout.

6. Position the patterned square in the center of the white square.


7. Select Layer Style from the Layer Menu and choose Bevel and Emboss.

8 Adjust the settings as follows:


9. Press ‘OK’ when done. This will add a bit of depth to the patterned layer.

10. Merge all layers and Save the file as a JPG.


Now make a bunch more, using different parts of the same background sheet and with different backgrounds.

Once you’ve got a collection, use them to build a card or two or as a layout element. Try these with different kits or with different colored backgrounds. You can also print at home and use them to create hybrid cards!

My version of the card that appeared in the Scrap Rap!

These inchies make nice embellishments, don't they?
And here's another card idea!

The next time you’ve got a few minutes to spare, create some digital inchies and use them to make all kinds of wonderful things.

See you next week!


-Ron

Wednesday, September 25, 2013

It's a Take Wing Blog Hop!

Welcome to the Take Wing Blog Hop! We're so happy you've joined us. Grab a beverage and get comfy while our gifted bloggers share tons of creativity and inspiration . . . Take Wing style.

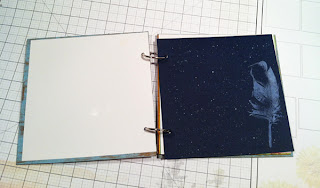
My project is the cute little mini album below. For brief instructions, see the end of this post.


Here's the full list of blogs on our hop today:

Club Scrap Creates (you are here)
Pat Huntoon: The Technique Trail
Julie Heyer: Cape Cod Scrapper
Roni Johnson: Ink Stains with Roni
Deb Charlesworth: Liftbridge Cards and Crafts
Deb Weller: Deb Duz Scrappin
Jill Pechauer: Jill's Place
Tricia Morris: The Efficient Crafter
Hetty Sanders: CraftChaos
Kay Williamson: Kay's Keepsakes

Cathy Gray: The Artful Gamut

Anne Hunter: Crzymom'sTidbits

Debby Hernandez: Masculine Inspirations

Janet Moran: Dishing with Janet
Tiare Smith: iClassy Girl
Lisa Oglesby: Carpe Memoria

Marya Kaszubinski: A Notebook Novel
Annette Dragon: Digital Musings

Thanks for hopping along. Your next stop is Pat over at The Technique Trail. Enjoy!

Mini Album
This is a great project for a quick gift, as the construction is rather simple: 
  1. Trim matte board to create two 6-1/4 x 6-1/2" covers. 
  2. Grab four 12x12 papers from the Take Wing Lite paper pack and trim to 6x6". 
  3. Trim two 6x9" business envelopes to 6x6", trimming away the sealed side. (This creates a fun pocket for ephemera.)
  4. Punch two 1/8" holes in each matte board cover, and all of the 6x6" pages, to accommodate binder rings for the spine. 
  5. Decorate as desired.

A 6x9" Envelope page. Great for storing fun memorabilia.
Decorate inside pages with stamping and other techniques.
Decorate cover with fibers and printed paper.
Supplies used:


Creatively yours,
Karen

Tuesday, September 24, 2013

It's a Lock & Key Spoiler!

I suppose I should keep this whole thing under "lock and key," but I can't help it.

It's just too beautiful.

Kay is in heaven. So am I. Well, pretty much everyone who has previewed it is, too.

The unmounted stamps arrived, and we had to drop everything to get them mounted. (I'm glad Kay wasn't holding her camera at the time. Dropping that would have been very bad.)

I have only one photo for you, but I think it's very telling.

It tells you about the beautiful color palette, the striking hand-drawn images, the incredible ribbon and fiber selection, the choice handmade paper inclusion, some embellishments. Yeah. It tells a LOT.


Anyone want to come over and play?

If you want to claim this beauty as your own on October 1, there's never been a better time to join us! We'd be delighted to have you.

Here to inspire . . . 
Tricia

Monday, September 23, 2013

Video Inspired Cards!

Good Monday Morning everyone!

Take Wing Card 
I am sure you are saying to yourself, "this card sure looks familiar", well, that is because it should. Ron and Kay both created similar cards using completely different techniques. Inspired by Ron Perry's blog post last Thursday, I set out to create my own version. Check out Ron's excellent video tutorial HERE!

Here are the steps I took to create my Take Wing Digital Hybrid Cards.

Use Photoshop Elements to create a panel for your card,
while following along with Ron's video tutorial.
Print out your 4x5.25" panels on one sheet of 8.5x11" sticker paper.
Trim down your panels and choose 2 sheets of coordinating 8.5x11" cardstocks for card bases.
Purple and Shimmer Blue cardstocks shown from 2011 Papillon kit.
Ink edges of panels.  Score each 8.5x11" cardstock vertically at 4.25".
Then trim each sheet horizontally at 5.5" creating your 4 card bases.
Peel backing from sticker paper panels and adhere to card bases.
4 completed cards... almost...
...add a little extra bling using 2013 Spring Chorus rhinestones embellishments.
Completed Take Wing Digital Hybrid Card
Hope you enjoyed my version of this fun card and special thanks to Kay and Ron for providing the inspiration. Have a great week! 


Julie

Friday, September 20, 2013

Sneak Peek! Flip Photo Easel Project

Do you know what today is?

September 20th!

Take Wing Club Stamp Shipping Day!

And I'm really looking forward to this project "taking flight." Get it? :)

For those lucky folks receiving this option, we'll be sending the Flip Photo Easel Project. Here are a couple of sneak peeks . . .


(If you aren't a Club Stamp Member and want to be, check it out HERE.)

The project includes a dual-ring binder for displaying a dozen mini scrapbook pages, calendars, stamped artwork, ATC's, etc. on a handmade easel.


It's up to you how you decorate the pages, but mattes and a cutting formula are included! I think it's so fun and easy!


Hoping you enjoy it as much as I do!

Supplies:


Thanks for stopping by . . .
Kay at Club Scrap

Thursday, September 19, 2013

Digital Masking Inspiration in the Scrap Rap


Happy Thursday!

You know how I like to take paper crafting ideas and re-create them digitally, right? Well today my inspiration comes from Kay’s “Birds in the Moonlight” technique in the Take Wing Scrap Rap. As soon as I saw this cool idea, I knew that I had to recreate it digitally.

Here’s my finished card:


And here’s a video of how I did it:


Hope you found this video helpful! I hope you give it a try and post your creations in the Galleria at Club Scrap.

Until next week,


-Ron

Tuesday, September 17, 2013

Washi Ink Transfer Technique

Happy Tuesdee!

We've included an adorable roll of Washi Tape in the Take Wing Lite kit. I stumbled upon this fun technique and thought I'd give 'er a go. It turned out pretty cute, so you'll want to try it, too!

1. Gather a few coordinating ink pads. For this round, I used CS Ruby, Peridot and Tangerine. You'll need washi tape and white paper. The matte finish of the Take Wing White is lovely for this technique.


2. Pull some tape away from the roll and carefully burnish it directly onto the width of the ink pad.


3. Place the inked tape onto the paper, burnish, and remove. Yep, the washi tape came right off. That's how it works!


4. Repeat with additional colors, using a new piece of tape each time.


5. Stamp a solid image onto the inked areas with India Black ink. The images on the Take Wing stamps are perfect for this. (The birds on a wire are on the Art Nouveau sheet, and the quote is from the FontArt UM.)


6. Create a finished card with your new piece of artwork. 


7. Make another one with different inks and papers. (Ocean, Carnation and Orchid inks with Up, Up & Away papers featured here.)


Easy, right? Let me know how it works out for 'ya.

Supplies:


Have a creative week!
Tricia