Saturday, March 30, 2013

Pro Scrapbooker's League--Final Weekend!


This is the final weekend of PSL (Pro Scrapbooker's League). It's been a very busy and exciting season, with brand-new challenges, old favorites, and some new twists on old favorites. I'll be sad to see it end...but, hey...PSL Summer Camp is only a coupla months away, right?

The weekend isn't quite over yet, (and because of Easter, we still have til Monday) but I thought I'd share a few amazing stats with y'all. As of this morning, here are the number of submissions for each category...

Traditional/Paper Scrapbook pages completed: 2724
Cards completed: 1677
Digital Scrapbook pages completed: 505

Total count of artwork submitted: 4906

Incredible! Almost 5,000 pieces of art produced in the span of 7 weeks. If you're looking for inspiration, I encourage you to check out the  PSL Galleria...goodness knows you won't run out of stuff to look at...at least not for quite a while.

If you're new to our blog, and you're wondering "What the heck is PSL?" You can go HERE for more info. If it sounds intriguing, and you want to know when the next PSL season starts, sign up for our Club Scrap E-news and you'll be "in the know" for all things Club Scrap.

Have a creative day!
Karen

Friday, March 29, 2013

Singin' Sneak Peek Spoiler

Welcome to the Spring Chorus Sneak Peek!

The sun is finally out here in Wisconsin! We still have plenty of snow, but the birds are chirpin', and it's actually starting to feel a little springy around here! Maybe that's why I'm feeling the need to post a sneak peek of what we are working on here at Club Scrap for April's Spring Chorus Kit!

Hope you enjoy the sneak peek . . .


I'm really looking forward to sharing more of Club Scrap's April Spring Chorus Kit in the Scrap Rap on Monday. For now, wishing you a wonderful Easter weekend!

Kay at Club Scrap


Thursday, March 28, 2013

MYOB (Make - or Modify - Your Own Background)

Happy Thursday; Ron here with another digital tutorial for 'ya!

Lets talk about backgrounds. Each month the Club Scrap Digital™ Kit comes with 10-12 ‘sheets’ of digital paper, or backgrounds. But sometimes you just wanna customize. Right?

There are lots of ways to manipulate the backgrounds to create new and varied looks for your scrapbook pages. Today let's cover four simple techniques.

1. Recolor
Open a background file, drag it onto your layout and than use the Image -> Adjustments -> Hue/Saturation command (Ctrl-U on a PC, Command-U on a Mac) to adjust the Hue, Saturation, and/or Lightness of the background to change the color.

Before
After
2. Overlays
Many of the monthly Digi Kits include overlay files. Simply drop an overlay onto a background and it instantly becomes new! You can also apply a layer style to change the look of the Overlay even more.
Before

After
3. Combine
Put one background on top of another, add a layer style and admire the beauty that you’ve created. Easy-Peasy!
Before
After
4. Combine, Part Deux
Layer two backgrounds and reduce the opacity of the top layer for yet another look!
Before
After
Bonus: Combine, one more time!
Mix 'n match two of the above techniques for even more variety. The sky's the limit!

So there you have it . . . 4 (or 5) easy ways to create variations in your backgrounds. Now go and create your own, and use them to make something wonderful!

Wednesday, March 27, 2013

Welcome to the Bookshelves Blog Hop!

Welcome blog hoppers! Thanks for stopping by!

Each month, Tricia designs 15 beautiful cards using the supplies included in the Greetings to Go pack. From there, she writes a full set of instructions so that you, too, can follow those instructions exactly, or use them as a jumping-off point, to create 15 awesome cards of your own.

In addition, each month we select a Greetings to Go Guest Artist, whose cards are scanned and photographed to be published in the Club Stamp section of the Scrap Rap Magazine. For March, our guest artist was Marya Kaszubinski, and I couldn't wait to share the cards she created!


Unfortunately, the scans and photos just couldn't capture the dimension she created on some of her cards. She made clever use of the "open book" stamp; stamping it several times, and trimming each layer just a bit smaller than the previous layer, to ultimately end up with a very realistic-looking, three dimensional accent.


Here are more close-up photos of Marya's cards for your enjoyment...

Pleated brown ribbon, finished with a button.
A fun way to use scraps.


I love the secondary stamping...looks like a reflection!
Are you ready for more Bookshelves goodness? We have a total of 16 amazing blogs for you to visit today, so make sure you check them all out. Feel free to leave a little blog lovin', too...they'd sure appreciate it! Here's a full list of all of today's blog hop participants:

Club Scrap Creates (you are here)
Pat Huntoon: The Technique Trail
Julie Heyer: Cape Cod Scrapper
Ron Perry: Random Doorways
Roni Johnson: Ink Stains with Roni
Deb Charlesworth: Lift Bridge Cards andCrafts
Deb Weller: Deb Duz Scrappin
Jill Pechauer: Jill P's Place
Tricia Morris: The Efficient Crafter
Hetty Sanders: Craft Chaos
Kay Williamson: Kay's Keepsakes
Cathy Gray: The Artful Gamut
Anne Marie Healey: Artfully Balanced
Anne Hunter: Crzymom's Tidbits
Shona Gibson: Shona Scraps
Jen Rodgers: Scrap Happy Sisters


Well, it's time to hop on over to the next stop on today's Blog Hop, and say "Hi!" to Pat Huntoon at http://www.patstamps.blogspot.com/. Have a creative day!

Karen

Tuesday, March 26, 2013

Scrappin' the Scrapbooking Scraps

Hey, Bloggers!

There are tons of tips out there for what can be done with your paper scraps. Tips on how to organize them, where to store them, how to use them, etc.

But I have this little problem:


These are all the scraps I have left after creating fourteen 12x12 pages with the CS Bookshelves collection.

The big idea here is that there is a way to scrapbook without scraps. It's what we do. And it's pretty unique if you've never experienced it before. We call it "Assembly Line Scrapbooking."

Just in case this is new to you, here is a sample of our instructions:

They include the following helpers:
1. Color image of the completed pages, including final photo measurements.
2. Thorough list of ingredients used to complete the page.
3. Step by step cutting instructions using the most efficient and logical cutting method.
4. Matching paper cutting diagram for the visual learner. If the trimmed pieces are not used on the existing page, the diagram indicates where the pieces will be used. In the rare case that a paper is not used, that is indicated by an "x".

I've been told by countless crafters that they made the move from creative paralyzation to prolific scrapbooking with the help of these little instructions.

I just wrapped up the instructions for the upcoming Spring Chorus collection. Oooooh-lah-lah!

Are you curious? Join us if you're ready to scrap the scrappin' scraps!

Efficiently yours,
Tricia


Monday, March 25, 2013

Prepare to be WOW-ed!

Hey everyone, Karen here, wishing you all a happy Monday!


While Tricia and the design team are putting the finishing touches on our newest special edition "event",  WOW Spring, I thought I'd remind you that we still have a few past "events" still available in our online store. (For those of you who aren't familiar, "WOW" stands for "Weekend of Workshops".)

Club Scrap is well-known for our annual Retreats here in Wisconsin each Fall, but who can wait that long! Each WOW event includes a brand-new, original paper collection, several project Workshops, and other goodies...all for one economical price. Love the idea? WOW Spring will appear online very soon...but in the mean time, check out a few past "events" still available in our online store...while supplies last, that is!

WOW Holiday 2011 It's never too early to start working on handmade gifts for the holidays. This box includes enough supplies to create three (or more) holiday gifts, with plenty left over to keep for yourself. (Photos below.) You won't believe everything that is included...so go HERE to check out the full packing list!


Brewed Awakenings Project Pack  A coffee lover's dream! This java-themed collection includes three individual projects, all for under 25 bucks!


2012 Retreat in a Box I honestly can't believe there are any of these left. Last year's Retreat, in my humble opinion, was the BEST EVER. Retreat in a Box contains all of the supplies needed to complete more than seven Workshops...plus awesome gifts, goodies and tools...AND you'll learn lots of new tips and techniques. This l'il box will keep you busy for quite some time, and I guarantee you'll love the finished projects.


The photos above don't even begin to cover everything that comes in the Retreat in a Box...so check it out online...it's amazing the sheer amount of stuff included!

So, there you have it. You'll never be bored again (just kidding). But seriously, there's no better value out there...so run, don't walk, to the Gotta Have More! Dept. to order your favorite, before they're all gone.

Creatively yours,
Karen


Editor's note: some product links removed due to unavailability 6/13/13 jmh**

Friday, March 22, 2013

A Bunch Of Paper In Stitches

Friday Greetings from Kay here at Club Scrap!


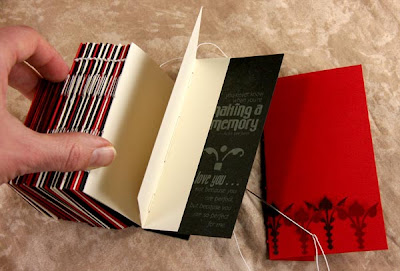
While walking through the Club Scrap warehouse this week, I stumbled onto this Study in Red Paper Bundle. It's a lot of paper at an amazing deal, so I thought to myself, "I should be using this!" And this kettle stitched Study In Red mini album was born.


There are different sizes of paper in this big bundle and plenty of each size to work with, so I scored and pierced stitching holes in three sizes. In the picture below, you can see how I clipped same-sized groups of papers together to help me get organized. I also made Z-shaped pages to serve as connectors.


Next, I unleashed the stitching bonanza! I first stitched the same-sized pages together and then added the Z-folded connectors. If you've never stitched a book, it's not very difficult. Check out Tricia's technique video to see how it's done.


It's probably a better idea to add the supportive paper strips in the binding while stitching. But no . . . I had to do it the hard way and wait until after the stitching was done! I used my handy wiggling technique and guided the support strips beneath the stitches with a needle. (Speaking of support, this is sort of like putting on a bra while wearing a shirt. Wiggling technique works there, too.)


What a fun handmade album! I like the repetition of the same colors throughout the project, so even though I have different sized pages, the consistent color scheme makes it all work.


Go get your own big bundle and make one, too. Thanks for stopping by!
Kay