Wednesday, July 31, 2013

Wisteria Blog Hop!

Welcome to the Wisteria Blog Hop. This month is our sixth hop already, and our list of participating bloggers continues to grow! Please help us welcome two new bloggers: Tiare and Vicki. I can't wait to see what they have in store for us.

I've been making so many cards lately that I'm afraid my albums are feeling a bit neglected. With that in mind, I decided to make scrapbook pages this month.

I absolutely love ALSB (Assembly Line Scrapbooking). You can get so much done in so little time, but sometimes I forget about the Layout Cards designed for our membership each month. Much like our Idea Decks, the Layout Cards aren't "paper-specific", so you can use them with any papers in your stash.

Up, Up and Away Layout Card

While exploring the past few months' Layout Cards, Up, Up and Away's caught my eye, so I paired it with papers from the Wisteria Club Scrap kit. All I had to do is gather the appropriate papers, trim them according to the instructions, and assemble.


I just love how these pages came out, don't you? The photos of my daughter, Emma, paired with the Wisteria prints perfectly! I really didn't need to do much to finish up the pages; just tinted the white silk flowers from the CS kit with my hybrid inks, added the LOVE sticker from the Lite kit, and channeled my inner "Kay" by adding a wee bit of glitter glue. I think the whole process took me about 30 minutes, start to finish!

So are you ready to see what our other bloggers have in store for us today? I've listed all of our bloggers below, just in case you lose your way.

Club Scrap Creates (you are here)
Julie Heyer: Cape Cod Scrapper
Roni Johnson: Ink Stains with Roni
Deb Charlesworth: Lift Bridge Cards and Crafts
Wendy Bellino: Made by Wendy Bellino
Deb Weller: Deb Duz Scrappin
Jill Pechauer: JillP's Place
Tricia Morris: TheEfficient Crafter
Hetty Sanders: Craft Chaos
Kay Williamson: Kay's Keepsakes
Cathy Gray: The Artful Gamut
Anne Marie Healey: Artfully Balanced
Anne Hunter: Crzymom'sTidbits
Jen Rodgers: ScrapHappy Sisters
Debby Hernandez: MasculineInspirations
Janet Moran: Dishingwith Janet
Tiare Smith: iClassy Girl
Vicki Terlap: Joyful Whimsy


In the mean time, your next stop is the uber-talented Julie over at Cape Cod Scrapper. Enjoy the Hop!

Creatively yours,
Karen

Tuesday, July 30, 2013

Stamp-free Wisteria Card

I came upon a cool idea on Pinterest for a card that featured free-hand cut openings showing patterned papers beneath. I thought it would be fun to give it a try with the Wisteria papers (and the Tribal papers releasing on Thursday!)

Here's how the Wisteria version turned out . . .


Supplies used:
Wisteria Printed and Plain Papers
White Gel Pen
Craft Knife and Cutting Mat
Pencil
Tape
Scissors

See? No stamps!

1. Free-hand cut random shapes from a 4.75x6.75" Dark Purple Panel.
2. With the back side of the cut panel facing up, layer it onto the plain side of a print and trace assorted shapes onto the print with a pencil.
3. Trim out the shapes with a scissors, being sure to cut the shape slightly larger than the outline.
4. Tape the corresponding shape behind the opening in the panel.
5. Use a white gel pen to add stitch marks around the perimeter of each cut shape.
6. Add a decorative text panel. (I used an Ivory cutapart.)
7. Nest the whole works onto a folded 5x7" card.

Back side of the card panel with the shapes taped into place.
This card was tons of fun to make! And quick, too. What do 'ya say? Give it a try!
Tricia

Monday, July 29, 2013

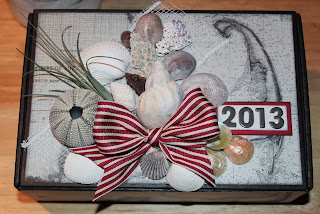
Cape Cod Memory Box - Part 1

Good Monday Morning everyone!

Cape Cod Memory Box

My family and I had such a wonderful week chock full of fun times spent with my brother Jeff and his wife and kids! They were only here for 6 days, but we filled every day with lots of fun activities. We spent time at the beach, played tourists at the Cape Cod Canal visitor center, took a tour of the Cape Cod Potato Chip factory, had a barbecue, ate ice cream, and played lots of games.

While sharing some of my family photos on Facebook, I noticed a post by my good Club Scrap friend Marsha Petty. It turns out, she was also making some family summertime memories this week too. A family reunion at the beach, what fun!  Her grandchildren had created mementos of their time at the beach by decorating cigar boxes with seashells that they had collected. I was totally inspired by their idea and recreated a version of their memory boxes for my blog post today.


Marsha's grandkids' seashell covered cigar boxes

I just happened to have a couple of antique cigar boxes from my dad waiting to be altered.

paint the perimeters of all sides of the box with Dick Blick matte black paint

close up of 1/4 paint line on inside of box

Allow paint to dry for 15 minutes. Choose papers from the Cape Cod kit.
Carefully measure all sides surfaces and then cut papers to fit. For example, the cover of the box was 5.5x8 inches and the paper was trimmed to 5.25x7.75 inches.

measure and trim papers selecting artwork from prints as focal images

adhere paper to inside lid of cigar box using Club Scrap Book Binding Glue

repeat for remaining sides including the bottom of the cigar box

inside of box covered in the Cape Cod dark gray print and plain cardstock

Cape Cod kit embellishments and "beach grass" made from the green cardstock


seashells and embellishments adhered to cover using hot glue

completed memory box

I hope you will join me next week when I share Part 2 of this project, a mini album full of photos from my brothers visit.

Thanks for stopping by and hope you have a wonderful week!

Julie

Friday, July 26, 2013

What's Better Than a Club Scrap Spoiler?

Happy Friday!

What is better than a Club Scrap Spoiler?!?! Nothing! I can't think of anything right now! So here we go! While Tricia, Brenda and Karen are busy at the Minnesota Scrapbook Expo, I thought it would be a great time for a sneak peek at what's to come at Club Scrap in August.

I've been happily busy creating projects with the Tribal Collection that will be shipping on August 1st.

Club Scrap August 2013 Tribal Collection
The color palette is awesome, the rubber stamps lend themselves to many fun stamping techniques, the prints are so versatile, etc. I know you are going to enjoy this one! If you aren't getting the monthly Club Scrap Kit, there is still time to SIGN UP.  

There is so much more to share, but I'd better stick to these images. I'll leave you with this fun rubber stamped quote from the Tribal Font Art stamp sheet.

 Your Daily Routine: Get Up, Be Amazing, Go To Bed
Wishing you a creative day!
Kay at Club Scrap

Thursday, July 25, 2013

Playing with Wisteria Digital

You may not know this, but I was away on vacation for the past couple of weeks. I did write a few blog posts ahead of time and I got them all loaded up & scheduled so it still appeared that I was posting every week - I couldn’t leave you hanging on Thursday’s for 3 weeks now, could I?

I spent 2 weeks in the Mediterranean on a cruise aboard the brand new Royal Princess and I gotta tell you, I had a great time! But I didn’t take my laptop with  me - I was on vacation, after all! - and I really didn’t get a chance to play with the Wisteria Digital Kit before I left. So I thought I’d share a few layouts with you - they all use photos from that amazing cruise, too!

First up, a Wisteria Quick Drop Digital Layout (QDDL) of one of my favorite spots in the Med - Mykonos, Greece:


Next, another QDDL of dessert from one night on the ship:


I gotta tell you, I love to use QDDLs - they’re just so quick and easy to use - I made both of these layouts in about 10 minutes - it took longer to pick the windmill photos than it did to make the layout!!

Last, a layout from scratch - this time using my favorite subject matter - a door! This door is in the beautiful town of Le Castellet in the Provence region of France:


Whew! I feel much better now - I’ve played a bit with this amazing kit and I’ve started scrapping my photos from vacation! How cool is that?

If you haven’t picked up the Wisteria Digital Kit yet, what are you waiting for? Go get it and create something wonderful!


-Ron

Tuesday, July 23, 2013

Pattern Basics, Projects and a Spoiler

I managed to carve out some creative time this weekend so that I could play with the new Pattern Basics papers. Yummy stuff!


I had additional incentive to make the "Art on a String" and "Photokeeper" projects, since I'll be teaching those workshops this weekend at the Minnesota Scrapbook Expo. Nothing worse than trying to teach something I haven't made since February, right? (We pack up and leave for the show on Thursday.)

Pastels used for the "Photokeeper" and Brights for the "Art on a String" Project


I'm so thrilled with how they turned out! And for those of you participating in the PSL Summer Camp, I just happened to sneak a stamped image from the UM sheet into the mix. Didjya see it? Mmmmmm. Yummy.

I know our Summer Camp project cabins are busy creating beautiful stuff. If you have these kits, be sure to give 'em a try!

Hope to see you in Minnesota!
Tricia


Monday, July 22, 2013

Cape Cod Glow Lamp Project

Good Monday Morning Everyone!

The ProScrapbook's League (PSL) Summer Camp has been in full swing the past few weeks and I am the proud Counselor of the Jewel Beetles Project Cabin. This was the first time Club Scrap has formed Project making teams. It has been a great motivation for members to take out all of their Club Scrap projects and complete them for points during Camp. Kay's Lacewings Project Cabin has been giving us a run for our money. Everyone agrees, it has been a welcome addition to the PSL lineup of team choices.

As a Counselor,  I am not allowed to submit projects to my team's gallery for points, but it didn't stop me from creating a project this week. When I first received my Cape Cod kit back in May, I knew I wanted to use it to make one of Kay's Holiday Glow Lamps. We were introduced to that project during the Holiday WOW 2010.

here is my Cape Cod version

stamped translucent paper with Cape Cod UM stamps and colored with markers

glued torn strips of tan cardstock to the exposed book board base to mimic sand

hot glued shells, beach glass and beach grass to base


Supplies used:
Club Scrap - Scholarship Tan HPOPs
Club Scrap - Memoirs Green cardstock inked with Distress Peeled Paint ink for beach grass
Club Scrap Bookbinding Glue
markers for coloring
shells and beach glass from my stash

Hope you enjoyed this beachy version of a fun Club Scrap project.

Have a fantastic week!

Julie


Friday, July 19, 2013

Pattern Basics Excitement Continues At Club Scrap

Greetings Friday Bloggers,

The excitement about the new Pattern Basics continues here at Club Scrap!


Altered Panel Book Covered With Neutral Pattern Basics
Sure, this paper is super for scrapbook pages, but what REALLY makes me happy is how great it works for projects! Many Club Stamp project have the components only/paperless option, and this sweet collection is perfect for such a thing! I used the Neutral Pattern Basics for covering this Altered Panel Components Only Book Project. Do you remember this Retreat Project? It's a huge removable accordion that slips into the book cover for safe keeping, and it looks great in this paper, too.


When you purchase the components, you will also receive a link to my instructional video to help you assemble the book. A little about the construction . . .

Cover large matte board panels with Pattern Basics creating inside accordion.
Attach Pattern Basics to outside cover.
For interesting cover, piece together more than one pattern.
Rubber stamp sentiment from Random Doorways Collection to fit label holder.


The Pattern Basics Collection has a ton of possibilities. It would be fun to use on the Musical Hope Chest, or the Hidden Doorways Project, or the Card Keeper, or the Spring Chorus Photo Keeper just to name a few! Oh my, I must go make more projects!

Enjoy the Pattern Basics!
Thanks for stopping by.

Kay at Club Scrap


Thursday, July 18, 2013

"Punch Up" your Layouts with a Digital Punch Technique

A couple of weeks ago, I posted a layouts using a ‘digital punch’ technique using the American Flag Collection. Today I’d like to show you how I did it.

Detail of "Old Glory' Punch effect

This tutorial uses Club Scrap’s July Digital kit, Wisteria.

The instructions imply that you have some familiarity with Photoshop and the concept of layers.

1. Start with a basic layout. Here we’ve got a background, matte layer and a stamp graphic image that we’ll ‘punch out’ of the matte layer.

Layout Starting Point
2. Select the matte layer.

3. Apply a ‘paper bevel’ effect with the following settings in the Layer Styles Dialog box. This gives the matte layer a bit of depth.

Adding Inner Shadow & Bevel and Emboss Effect

4. Apply a drop shadow while still in the Layer Styles Dialog.

Adding a Drop Shadow

5. Click ‘OK’ once all the Layer Styles have been set.

6. Select the stamp graphic layer.

7. Ctrl/Command-click the stamp graphic layer thumbnail in the Layers Palette. This will display ‘marching ants’ around the graphic.

"Marching Ants"
8. Click the ‘eye’ icon for the stamp graphic layer in the Layers Palette. This will hide the layer.

9. Click the matte layer to make it active.

10. Press the delete key. This will remove (or ‘punch out’) the stamp graphic shape from the matte.

The 'Punch' Effect
That’s all there is to it! there is a paper bevel and drop shadow applied to the matte layer, the ‘punch’ effect is enhanced a bit.

Detail of the 'Punch' Effect
This effect works best with bolder shapes and worked equally well with bold fonts.

The next time you want to ‘punch up’ a regular layout, try a digital punch technique!

Thanks for stopping by!


-Ron