Wednesday, October 31, 2012

Beaded Canvas Project

Hello, again! I can't remember if I mentioned it on Monday, but I had the pleasure of teaching TWO awesome Workshops at this year's Retreat. I've always had a special place in my heart for hand-made books, and this little beaded beauty is no exception. I just love the edgy, rustic nature of the frayed canvas cover and the artfully torn inner pages...so cool!


The color scheme of the class version is just beautiful...a gorgeous combination of peach, coral and teal. The beaded canvas cover is one of those things that looks intricate and difficult, but it's really quite easy...especially when you have l'il 'ol me to guide you in the free video tutorial (included with purchase). I couldn't resist grabbing a couple of Memories Mists in complementary colors to spritz over the flourish "mask" from the Versailles kit. Didn't it turn out great?


As with other Retreat projects, there are a few color variations available that I'd like to share with you.

The cream, peach, and clay palette of the "Sedona" version was perfect for the pictures from my trip to Arizona. I stamped the canvas cover with a medallion image from my Adobe Unmounteds, and stitched on a handful of beads included in the package. With a quick spritz of copper metallic and golden yellow pigment ink mist, this awesome mini book was complete.


This next version is called "For Him"...but really, this book was all for ME!!! The color palette of denim, blurple (yes, that IS a color...a blend of blue and purple, lol), and olive green was the perfect complement to photos taken in my flower garden. The cover was embellished with images from the Dashing UM, beads included in the kit, and some coordinating metallic spray mists. Simply divine!


Finally, the third and final version of this project is called "Theme Park". My good friend Kay snapped up this variation, and put her own spin on it...with plenty of cool little details...just like Kay is famous for! Decorated with UM stamps from the Retreat 2012 collection, she even added an adorable mini book that is stored...get this...in a precious little pocket sewn into the front cover! Wowza...how awesome is that?!?


With 36 pages, this little book comes with plenty of real estate ready for your photos or other memorabilia...it would even make a really cool journal! And it's nicely sized at about 5x7, so it's totally portable (think brag book for moms or grand-moms!)

Be sure to check out all of the variations available for the Beaded Canvas Project online...coming soon!

Creatively yours,
Karen


Tuesday, October 30, 2012

Oil Pastel Techniques

I challenge myself to explore a new technique every year for my Retreat workshop. It all begins by locking myself in the craft room for a play day. Typically, most of my experimentation ends up in the "circular file," but I'm okay with that. My art medium of choice for 2012 was oil pastels. I used colors from Faber-Castell's Creative Studio's 12-pack for the class, and we had some fun!

We explored four different techniques and made ten cards during our two-hour workshop. Once we finished trying each concept once or twice, everyone had a little extra time for play. (My favorite part!)

These were the supplies for the class:
Faber-Castell Creative Studio Oil Pastels, 12-pack
Mineral Oil
Heavy Duty Shop Towels
Water Brush
Watercolor Crayons (or Gelatos)
CS® India Black Inkpad
CS® Unmounted Leaf Stamps (designed just for the workshop)
Cards, Panels and Envelopes
CS® Grid Ruler
Permanent Fine Tipped Marker

One advantage to teaching the workshop four times is that I'm able to make a whole bunch of samples for demonstration. Now I've got a huge pile 'o cards for Christmas gifts. And it's only October. Check.

If you own some oil pastels, dust 'em off and book in some playtime. Watch for the class kit to become available later this week. It will include a video of my workshop so that you can learn the techniques we used at Retreat. It's the next best thing to being there!


Creatively Yours,
Tricia

Monday, October 29, 2012

Passport to FUN!!!

Happy Monday, everyone!

These past few weeks have been busy...but unfortunately, until now, we had to keep most of what was keeping us so busy a "secret". Do you know how hard that is? (Well, I suppose if you attended our August or October Main Retreats, you know exactly how hard that is!) Anyway, tonight is a very special night, because WE KEEP SECRETS NO MORE!!!

You see, tonight is the live chat that officially kicks off the Retreat in a Box event. We can finally show off our Retreat projects along with all of the other Retreat goodness without spoiling anyone's surprise. Whew! What a relief!

My good friend Kay designed it, but I had the pleasure of teaching the project that Retreaters did on the first night of Retreat. This project is called "Passport to Fun"...and it went along perfectly with the travel theme of the 2012 Retreat.

This is the workshop version, stamped with a "Full Circle" quote.
I always think of the Thursday night Workshop as kind of a "warm-up" for all of the other projects attendees will do throughout the weekend...not too hard, but just challenging enough that folks have fun learning something new.
The colorful inside pages featuring my youngest son, Max.

You won't believe how much space there is for photos and other memorabilia. I think I counted at least 34 places for photos or other fun "stuff" among all of the pages and pockets.

(Fun fact: This project measures 5-1/4 x 7-1/4"...all of the invitations and menus from the Retreat meals were 5x7 or smaller...making this the perfect place to store Retreat souveniers!) 

As with most of the Retreat projects, we created different color variations to sell at Retreat in the "Pro Shop". The red and brown colors of this version were perfect for photos from my trip to Arizona earlier this year:


This pink, white, and black version offered a lovely feminine backdrop for photos of my daughter, Emma:


Finally, last but not least...this very cheerful color version with 2 shades of blue with golden yellow. I used this version for photos of my oldest son, Hunter:


I just love the versatility of the accordion-style pages...it even includes a cute little grosgrain ribbon "belt" to hold the whole thing together whenever it's not being enjoyed.

So there you have it. What a great project! I know it's not really fair to tease you like this...but I hope you'll visit the Gotta Have More! Dept. to grab a couple for yourself when they go up online next week...it even comes with a free video tutorial featuring moi! Hey, there's no harm in starting your shopping list now, is there?

Creatively yours,
Karen

Friday, October 26, 2012

I've Uncorked My Autumn Garden

Autumn Greetings from Kay here at Club Scrap.
I've had the pleasure of making a few little projects with the new Uncorked and Autumn Garden collections and thought I'd share.


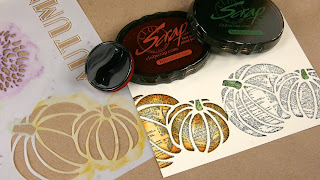
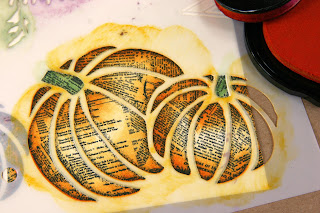
First, the Autumn Garden Unmounted Stamps and Stencil. Oh, boy, this is a fun one!!! The pumpkin UM and the pumpkin stencil images are sized to work perfectly together! Check it out.

First the rubber stamped pumpkins,

now the stenciling right over the rubber stamped pumpkins.

So cool how they work together to create this artistic look!


While I was having so much fun with the stencil, I added a little black marker to the stenciled letters.

I say, let the fun continue!!!
Now about the mum on the stencil.


I started by adding a thin coat of white acrylic paint onto a text print.

Then stenciled the mums onto the paper with a foam brush and acrylic paint.

If you use a rag to apply paint to the stencil, it creates a softer look. 

Then I added a few finishing touches.


And let the fun continue!!
I'm so glad we finally got to pop the cork on this collection. Here is a BDay card I whipped up with the new Uncorked Unmounted Rubber Stamps and round kraft coaster Sticker Labels. (Those sticker labels are included in the collection!)

I couldn't resist making my wine glass half full by adding some wine to the rubber stamped glass. I used a wet brush to simply pick up the color from an ink pad. Easy!


I can imagine many stamping and stenciling techniques happening with these new items, and I didn't even break into my stash of beautiful papers in the Uncorked and Autumn Garden collections! That's next . . .

Thanks for looking, and enjoy our new collections!
Kay of Club Scrap

Thursday, October 25, 2012

Shhh! It's an Equestrian Sneak Peek!

Hi everyone! Ron from Club Scrap® here today with a sneak peek of November's Equestrian Kit. That's right, a sneak peek - how cool is that?

Don't worry, I'm not gonna get into any trouble or anything. I mean, its not like I secretly brought a camera into CS® Headquarters when I was there a couple of weeks ago and took photos of super secret stuff or anything (okay, well maybe I did, but what happens at CS®, stays at CS®, right?).

Seriously, I actually got permission from Tricia to post this spoiler - sure, I'll tease folks about upcoming kits and how cool they are (like the stuff that's being released tomorrow - just wait 'til you see it!), but I wouldn't share photos unless Tricia said I could - 'cuz really, isn't the surprise factor part of the fun every month?

So without further ado, here are a couple of images from the Equestrian Kit:

Isn't this paper gorgeous?

Oh! Someone's been making cards!
Okay, that's all I can share with you, but isn't it cool? Just wait 'til you see the rest of it next week!

Until next time, go create something wonderful!

Wednesday, October 24, 2012

Introducing: Megan Elizabeth!


Hello Everyone,

My name is Megan Elizabeth, and I am so very excited and thankful to be sharing this video with you today.  Working with the Club Scrap team has been awesome, and I am absolutely certain you are going to love everything included in this month’s Peacock kit--I know I do! 

One of the new things Club Scrap included in the Peacock JR Kit is a package of my Chipboard Alpha Stickers in White Cloud. These stickers are so very fun for creating beautiful and totally customized projects. The beautifully shiny coating on this white alphabet is a perfect match for the shiny coating on the Peacock-inspired papers and embellishments this kit has to offer.

The beauty of these stickers is that you can custom-color them with your favorite inks, embossing powders, glitters and more. The secret is to make sure you use a heat-tool to “set” any customization mediums…and it will be the perfect!

I created this little video sharing two easy-peasy projects that really allow this paper to speak for itself. The colors are brilliant, and the shiny texture is just right, so please enjoy creating along with me.


I can't wait to see all the projects and ideas you create with this fantastic JR kit and how these Peacock feathers inspire you!

I hope to join you again soon at ClubScrap.com for more fun and creativity very soon.

Enjoy the Moments!
Megan Elizabeth

A little about Megan:

Megan Elizabeth is the founder and creator of www.AboveRubiesStudio.com, with a best-selling line of fun and educational how to DVDs. Megan loves to inspire fellow crafters to create simple and meaningful projects in everyday paper crafting and to always Enjoy the Moments! Megan has a popular line of unique products including the award-winning Paper Layerz die-cuttable paper and simple and different embellishments that “bling-up” any project. She's a mother of two small children and loves to spend free time walking around her favorite craft stores with a latte and getting her favorite pretty paper out to be inspired and create everyday.  

Tuesday, October 23, 2012

Inked Gradient Technique

I saw a nifty set of cards on Pinterest this weekend, and I loved the simplicity of the technique which requires only three ink pads . . . two colors and one black.

I thought I'd give it a try with a few of my favorite CS® inks and stamps.

I started with Leaf ink and sponged it onto the bottom half of a 4x5.25" White panel with a CS® Ink Applicator.

Next up, Lagoon ink, sponged onto the other edge. I have a few sponge edge marks on there, but we'll take care of those in the next step.

Stamp images onto the card with black ink. The images from the Orient Express collection make a great masculine card. And I added that crackle noise to the background with matching ink colors for a nice finishing touch.

Next, I tried it with Ruby and Topaz inks along with stamps from the Comfort Zone kit. Yummy! I love how the two ink colors combine to make a secondary color in the middle. Here are the two completed cards.
I hope you give 'er a try!
Tricia

Saturday, October 20, 2012

CS® and Pink


I'm not sure how many of you are aware that CS has the most awesome collection of unmounted rubber and paper.

It honors our dear ones who are battling cancer. And it provides a better option than "get well soon" because sometimes "get well soon" just doesn't cut it.

As I'm sure you know by now, October is Breast Cancer Awareness Month. True to form, I've got a card formula here that will help you utilize every single image on the "We Are Aware" Unmounted Sheet on a series of cards that you can make in, well, about an hour.

Use the cards for your next Operation Write Home mailing, a ministry at your church, or to have on hand when you just need to express love and support to a friend or family member who is facing cancer. All of the cards will fit into A2 envelopes so that they'll be easy to send at a moment's notice.

This formula is really intimidating and quite advanced, so take your time with the cutting instructions.

You'll need:


  • Trim 8.5x11 Paper A horizontally at 10, 8.5, 7, 5.5, 4.25, and 2.5".
  • Trim the 2.5x8.5 horizontally at 4.25".
  • Cut the 1.75x8.5 horizontally at 7, 5.25, 3.5 and 1.75".
  • Trim the 1.25x8.5 horizontally at 7.25, 6 and 3".
  • Cut two 1.5x8.5 strips horizontally at 7.5, 6, 4.5 and 2.25".
  • Trim one 1.5x8.5 horizontally at 4.25". Cut the 1x8.5 horizontally at 4.25".


  • Trim 8.5x11 Paper B horizontally at 10, 8.5, 7.25, 5.5, 3.75 and 2".
  • Cut the 2x8.5 horizontally at 8, 6, 4 and 2".
  • Trim one 1.75x8.5 horizontally at 7, 5.25, 3.5 and 1.75".
  • Cut the 1.5x1.75 horizontally at 1.5".
  • Trim one 1.75x8.5 horizontally at 7.5, 5 and 2.5".
  • Cut one 1.75x8.5 and the 1.25x8.5 horizontally at 4.25".
  • Trim the 1.5x8.5 horizontally at 8, 6.5 and 3.25".
  • Cut the 1x8.5 horizontally at 4.25".


Trim 8.5x11 Paper C horizontally at 10 and 5".
Cut each 5x8.5 horizontally at 7.5x3.75".
Trim the 1x8.5 horizontally at 4.25".


  • Score 8.5x11 Paper D vertically at 4.25".
  • Trim each sheet horizontally at 5.5".
  • Fold each piece in half to make card bases.


Congratulations if you made it this far!

Stamp each white piece with corresponding images from the UM sheet. Consult the finished cards, or dive in and put them together however you wish. Nest the stamped white panels onto the Dark Pink mattes.

Here's to beating cancer.
Tricia