Showing posts with label chalkboard. Show all posts

Thursday, January 16, 2014

Graffiti Chalkboard Paper Techniques

Now that the Graffiti Lite Kit has shipped, you'll be seeing the Chalkboard Paper Goodie soon!


This 12x12 sheet may look like another piece of black paper at a glance, but it has a very unique finish that resembles a chalkboard texture! It's perfect for chalkboard art and stamping effects.


Chalkboard Easel Technique


1. Use White Pigment Ink and a Foam Applicator to rub ink onto the outer edges of a 3.75x4.5" Chalkboard panel. Then add a few more cloudy-looking smudges to the interior. Thankfully, this isn't a project that requires neatness.


2. Stamp a sentiment onto the panel with White Pigment ink. (Image from the UM Greeting.)


3. Use the Graffiti Souffle Pen and Grid Ruler to make a border around the perimeter of the panel. (When I first used this pen, I was worried it wasn't going to show up. Give it a moment to dry and its white opaque quality shines through!)

4. Cut, score and fold a piece of brown paper to create a 4.25x6" card base. Use a craft knife to remove cardstock 1" from bottom and 3/4" from the left and right edges.


5. If desired, stamp onto the card base and distress edges with Earth Ink.


6. Layer the chalkboard panel onto a white panel and adhere to the card base.


7. Finish with embellishments from your stash and stamp a greeting inside. 


The Chalkboard Sectional


1. Cut a 4.5x6.5" ChalkBoard Paper panel and repeat step one from above. Place an 8 x 8" Grid Ruler over the panel and arrange stamps to fit within the space, keeping in mind there will be straight lines drawn between the images.


3. Stamp the images onto the panel with White Pigment ink.


4. Use the Grid Ruler and Souffle Pen to create a border and sections between stamped images.


5. Color open spaces with colored pencils (Pastel pencils and watercolor pencils worked well, too. Try testing onto the back of the panel.)
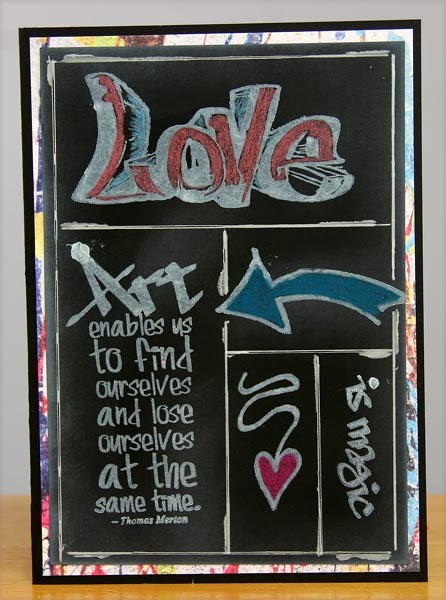

6. Matte the panel with the Graffiti White Print and attach to a 5x7" card base.

Doodle Chalkboard Card


1. Cut  ad 6x4.25" Chalkboard Paper panel and treat with White Pigment Ink to give it a chalkboard effect. Stamp a greeting with White Pigment ink. Doodle and color the panel with colored pencils. 


2. Adhere the panel to a 4.5x6.25" card base.


Have fun with your very own sheet of this amazing Chalkboard Paper!

Thanks for stopping by,
Kay at Club Scrap

Tuesday, January 14, 2014

Graffiti Instant Album Page

Ever since Ron taught the Instant Album at the 2013 Retreat, I've wanted to give the concept a try. (If you're not familiar, the Instant Album uses page protectors with assorted pockets on each page, rather than a full size 12x12 page.) It turns out this type of scrapping was perfect for the page I wanted to do about my Godson, Kian and his brother, Alek. Both boys shaved their heads on Saturday as a sign of support for their friend who had brain surgery yesterday.

The Graffiti collection offered just the right "vibe" for photos of these awesome young men.


I chose the page protector from the Instant Album that has six 4x6" pockets. So to create the inserts, I cut one Black Smooth Plain, and one White Smooth CS Print so they'd create the 4x6" inserts and mattes I needed for the page. To accomplish this, I had to do a little math. Math is hard. Especially without my friend Tricia to help me. But I figured it out!
  1. Trim both 12x12s at 11.5 and 6". 
  2. Rotate the 6x12" horizontally, and cut at 8 and 4".
  3. Trim the 5.5 x 11.5 horizontally at 10.5, 7, and 3.5". 
Assuming you were successful with the above cuts, you should end up with six 4x6" bases and six 3.5 x 5.5" mattes for each of the pockets in the page protector.

The upper left panel was created using a faux chalkboard technique. I stamped "Love" from the Collection UM stamp sheet and traced the cloud, arrows, and star shapes from the Graffiti Stencil in white chalk ink marker.

The journaling box is from the Embellishment Cutaparts. The other panels were decorated with additional stamps from the Greeting UM and Borders & Backgrounds and colored with the Neon Ink Dabbers. The heart was cut from a Pink Photo Matte using a Spellbinders die.

This page is a great way for me to document the act of kindness of these great guys. I'm so proud of you!

Creatively yours,
Karen

Friday, January 10, 2014

Graffiti Chalk Board Art

I spend a ridiculous amount a lot of time on Pinterest. I enjoy the eye candy and getting inspired to make different projects. I saw this project the other day:

Pin found here.
I liked the graphic nature of it, but if I used something like this for my grocery list, I'd run out of room fast!

I decided to put my own twist on the project and whipped up the little clipboard/chalkboard below. Being the creative person I am, I thought it would be a cool way to display my artwork du jour.


I started with a clipboard from the Dollar Store and painted it with two coats of black chalkboard paint. After the chalkboard paint dried, I stamped the word "Art" and the arrow images using the Graffiti Unmounted Rubber stamps and white acrylic paint. (Remember to clean the acrylic paint off of your stamps right away!) Once that was dry, I chose several colors of neon dabbers to color in the artwork. I squeezed a small pool of ink dabber onto scrap paper, then used a fine tip artist's brush to color in the fine details. The doodle edge detail was hand-drawn with a white chalk marker.

Now I have a FUN-ctional way to display my ever-changing favorites!

Creatively yours,
Karen