
Did you see the cool technique that Kay did in the Rap with mists and the 12x12 Lock & Key stencil?
Did you know that this is totally doable digitally? Let me show you how!
Note: I’m using Photoshop CC, but any graphics software that supports layers should work for this.
Because the Lock & Key Digital Kit doesn’t include that awesome stencil graphic, we’re going to make our own version of the stencil and then use it to mimic that shadow effect, so we’ll tackle this technique in two parts:
First, let’s make a stencil . . .
1. Create a 12x12 300ppi document with a white background.
2. Open 1013LockKeyCSD_Xtra01.png and drag it onto your new document.
3. Click and drag on one of the corner handles to resize the key image until it’s about 6-8 inches across.

Tip: Hold down the Shift key while resizing to maintain the graphic’s proportion.
4. Ctrl+Click (Windows) or Command+Click (Mac) on the key image layer in the Layers Palette; this will select the key graphic. You’ll see "marching ants" around the graphic.
5. Color the graphic Black: Edit -> Fill and select Black. Click on Okay. The key graphic is now solid black.

6. Deselect the key graphic: Ctrl+D (Windows) or Command+D (Mac).
7. Duplicate the key graphic layer.
8, Move, rotate, and resize the new key layer, positioning it so that it touches the original layer.
9. Repeat steps 7-8 as many times as needed to create a stencil-like image that fills the page. Don’t worry if some of the graphics extend off the page, or if the graphics don’t fit together ‘perfectly’ - it’s all good! Keep playing until you’re satisfied with the overall look.

10. Select all of the key graphic layers and merge them together: With the layers selected, Ctrl+E (Windows) or Command+E (Mac).
Note: Do not select the white background layer in step 10!
11. Delete the background layer and save this file as a PSD or a PNG (with transparent background) so that you can use it over and over again.
Okay, that’s the stencil part - now, let’s make a background . . .
1. Create a 12x12 300ppi document with a transparent background.
2. Open one of the Lock & Key backgrounds, I used #6.
3. Drag your newly made stencil onto the document.

4. Ctrl+Click (Windows) or Command+Click (Mac) on the stencil layer in the Layers Palette; this will select the stencil. You'll have those "marching ants" around the graphic.
5. Invert your selection so that everything EXCEPT the stencil is selected: Select -> Inverse or Shift+Ctrl+I (Windows) or Shift+Command+I (Mac).
6. Pick a color - I chose a turquoise shade: Click the foreground color in the Tools Palette and select a color in the color picker, then click Okay.
7. Switch to the Brush Tool and select a ‘Spatter’ brush; enlarge it to around 1200 pixels and reduce the opacity to about 65%.
8. Create a new layer ABOVE the background layer.
Tip: Create a new layer for each color - if you don’t like a particular color or effect, it’s easy to delete that layer and start again!
9. Create a ‘spray’ effect, by clicking once somewhere on your page; move your cursor and click again. Continue this ‘Click-Move-Click-Move’ technique until your satisfied with the color spread. You’re looking for fairly even color, with a few ‘unsprayed’ spots. Don’t be afraid to vary the size of the brush or change the opacity. Play until you’re happy with the look.

10. Select the stencil layer and deselect it: Ctrl+D (Windows) or Command+D (Mac).
11. Use your arrow keys to move the stencil slightly - I hit the down arrow 3 times and the right arrow twice.
12. Repeat steps 6-10 with a second color - I chose a medium-dark brown for my second color.

13. Hide the stencil layer by clicking on the ‘eye’ icon on that layer in the Layers Pallette.

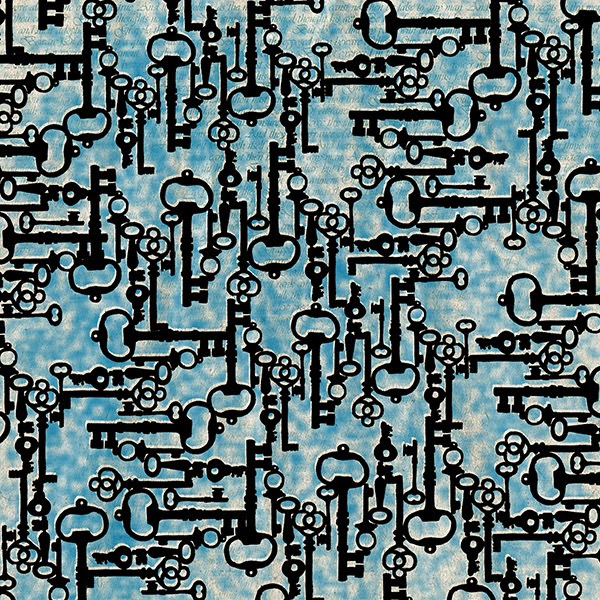
Cool, huh?
So what can you do with this amazing creation? Merge all the layers together and save it as a new background. Then use it in a layout or part of it for a digital (or hybrid) card. Try it with Different graphics to create your own custom stencils! The sky’s the limit!
 |
| Here's a layout made with my new background. |
 |
| And here's a digital card! |

-Ron
Amazing!!
ReplyDeleteRon you crack me up! Even though I don't do digi I always like checking out what you have going on. Those directions kind of made my head hurt but you outlined the steps so perfectly that I'm sure it could be recreated! Nice job as always!
ReplyDeleteWow, Ron -- is there ANY paper/ink technique you CAN'T duplicate digitally???? Thanks for this awesome tutorial! (Oh, and have a terrific retreat -- I will just have to re-live August memories this weekend!!!)
ReplyDeleteLynn, this is my new goal in life - to digitally replicate every paper technique I possibly can! (and we're having a blast at retreat!)
Deletewonderful Ron
ReplyDeletecool!
ReplyDelete