As long as you begin with two squares of paper, you can create any size box.
1. Trim Pattern Basics Neutrals to 8x8" (lid) and 7.75x7.75" (base).
2. Use a grid ruler and pencil to locate the center of each square.
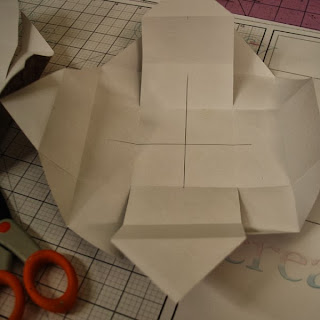
3. Fold the four outside corners to the marked center. Burnish all folds with a bone folder.
4. Fold each straight edge to the center.
5. Unfold each paper and make four vertical cuts along the innermost creases, stopping when you reach the square in the center.
6. Fold in the left and right side walls, and turn in the tabs to form a 90 degree angle.
7. Bring the remaining side walls up and over the tabs. Secure with adhesive. The lid should slide snugly onto the base.
8. Use a Crop-A-Dile or Japanese Screw Punch to punch holes in two sides of the base and corresponding top of the lid. Reinforce holes with eyelets. I had to use a combination of eyelet setters and the Crop-A-Dile to set the eyelets.
9. Thread ribbon into one side of the base, through each hole in the lid, and then back out the other side of the base. Allow enough slack in the ribbon so the lid can be lifted.
10. Tie a knot in each ribbon at the box base. Cute as can be!!! The wee box measured 2.75x2.75".
It's never too soon to get a start on your holiday box-making!
Tricia


SO cute!! Love this technique and definitely going to try it! Thanks for sharing.
ReplyDeleteI absolutely love this - thank you so much.
ReplyDeleteHow sweet! Would make such cute little gift boxes hanging on a Christmas tree. Thanks for inspiring!
ReplyDeleteOoh, I like that idea, Lisa!
DeleteMe too, good thinking Lisa!!
DeleteA cutie box,Tricia,great for jewelery gift and mini books.
ReplyDeleteThanks for the inspiration.
Great box for multiple functions.Thanks so much for all your creative ideas and instructions.
ReplyDeleteSo cute!!
ReplyDeleteAnother great project, Tricia. I can think of so many ways to use these li'l boxes!
ReplyDeleteAdorable!
ReplyDeleteSahweet!!!!!! Fantastic way to use the paper stash! Thanks for your constant inspiration!
ReplyDeleteI have a gift in progress that is screaming to go into one of these!!! Has this been pinned???? haha I see this as a go-to in my gifting future-thanks for the know-how!!
ReplyDeleteCOOL box! thanks for the tutorial!
ReplyDeleteI'm so making these in a workshop! Thanks Tricia
ReplyDeleteBeautiful!!
ReplyDeleteI tried to pin it but it says "there are no pinnable items on this page". Weird. Well, CS, I will wait for you to pin it to Gift Ideas or Projects or one of your boards....
ReplyDeleteNot sure why it wouldn't pin. I've got it on my "Tricia Morris" board under projects. :) Thanks for letting me know!
DeleteLook it's a wee box! How cute! I like the ornament idea a lot! Would be perfect as little money or gift card holders if you could get the size right.
ReplyDeleteHow totally adorable. Love the idea of a tree ornament!!
ReplyDeleteLove this box...Club Scrap paper has the best weight...make a good box! p.s. I was able to pin it.
ReplyDeleteI love this. I especially enjoy that the lid stays attached. So nice!
ReplyDelete