


Turn your Hydrangeas stitch bound project kit into a beautiful album with the help of just a few basic supplies. If this is your first handmade book, be sure to check out our essentials video on wrapping and this oldie but goodie on stitching.
You'll need the following tools and supplies:
- CS Bookbinding Glue (BBG)
- CS Grid Ruler
- Foam Brush
- Scissors
- Needle
- Paper Piercing Tool and Corkboard
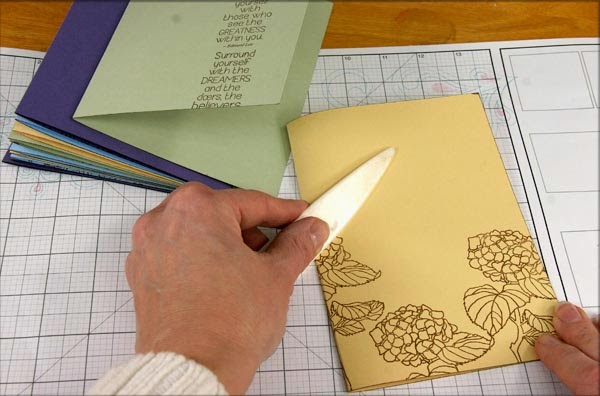
- Bone Folder
- Tape (Optional)
1. Spread bookbinding glue onto the book boards with a foam brush and center on the Purple Outside Covers. Burnish the paper onto the covers with a bone folder.

2. Use a scissors to trim away each corner at a 45 degree angle. Be sure to leave at least 1/8" paper beyond the tip of the book board corners.

3. Use a bone folder to pre-wrap the paper flaps around the boards. Brush glue onto the long flaps.

4. Burnish the long flaps onto the boards with a bone folder.

5. Tuck in the paper at each corner with the tip of the bone folder.

6. Adhere and burnish the short flaps.

7. Ink the edges of the White cutapart from the Embellishment Pack and attach to the outside front cover. We did not use this piece in the pre-assembled scrapbook pages. Alternatively, use a photo or other handmade element to decorate the book cover.

8. Fold each of the twelve inside pages in half. Decorate the pages with stamped images, if desired.
9. Use a paper piercing tool, ruler and cork board to pierce stitching holes along the crease of one folded inside page at .75, 2, 2.75, 4.25, 5 and 6.25".

10. Nest the pierced page on top of several additional pages and pierce holes in the same locations. Repeat until all pages are pierced.

11. Trim two 4" lengths of ribbon.

12. Cut the remaining length of ribbon in half.

13. Stack the pierced pages in the desired order. Be sure to maintain the orientation and order of the pages as you stitch them together, especially if you have decorated the pages with stamped text.

14. Thread needle with the waxed linen thread provided. Enter the top stitching hole from the outside to the inside, leaving a 4" thread tail. Stitch in and out of each hole until you reach the bottom of the page. Place the 4" lengths of ribbon beneath the long stitches on the outside of the page. You may find it helpful to tape the ribbon in place on the front of the page. This will help you keep track of the front of the book, as well. (Kay chose not to tape the ribbons down; she's that good.)

15. Remove slack from thread and close the first page. Place the second page beneath the first; enter the nearest stitching hole.

16. Stitch in and out of each hole until reaching the top of the page. Be sure to stitch over the ribbons.

17. Tie the thread tail from the first page to the working thread in a double knot to secure the first and second pages together.

18. Stack the third page beneath the first two. Enter the top hole and stitch back down to the bottom. Note: Always remove slack from thread, or the book will be "loose and wobbly."

19. When reaching the bottom, bring the needle beneath the stitch that connects the first and second page. Pull the thread until a small loop is formed.

20. Bring the needle through the loop and pull tight to perform a "kettle stitch."

21. Stack a fourth page beneath the third, enter the nearest pierced hole, and stitch back to the top. Perform a kettle stitch, stack another page, and stitch back to the bottom. Repeat until all pages have been secured.

22. Perform a double kettle stitch to secure. Trim the thread, leaving a 3" tail.

23. Tack the thread tails and ribbons to the outside of the book with tape or bookbinding glue.

24. Place the wrapped book covers on your work surface, being aware of the orientation, especially if the covers are decorated. Glue the ribbons to the outside left and right edges of the covers. "Type A" folks, use a ruler to find the center of the cover.

25. Brush glue onto the outside of the stitched pages and attach to the covers. Burnish the page onto the cover.


26. Tie the ribbon and trim.

Congratulations!! You've finished the book. We've sized it perfectly to hold 4x6 photos. You can take it from there . . .


Special thanks to Kay Williamson for taking the gorgeous photos while creating the book!
Tricia

The stitch bound books I my absolute favorite! Thanks for bringing back this wonderful project!
ReplyDeleteIt's adorable!
ReplyDeleteYay, I'm looking excited to have a little project to work on. This project is so versitile and will work for so many things!
ReplyDeleteOne of my favorite things to do, I so enjoyed making this stitched book! Not to mention, Kettle Stitching a handmade album together is much cheaper than therapy! Thanks for making this part of the Hydrangeas Kit Tricia!!!
ReplyDeleteWonderful booklet for one of my favourite flowers!
ReplyDeleteLove the little book, can't wait to do mine!
ReplyDeleteBeautiful! Thanks for sharing!
ReplyDeleteGreat project is there a PDF file of directions I can print?
ReplyDeleteIf you click on the title of the blog and scroll to the bottom of the entry, you will see an icon that says "Print". Once you click on the icon, you will be able to preview the document and print from there. You can also save the document to your computer as a .pdf.
DeleteGot it thanks I learned something new today!
Delete