Showing posts with label kettle stitch. Show all posts

Thursday, August 7, 2014

Lemonade Stand Mini Album

Since Tricia and the rest of the CS staffers are at Retreat, they invited me share a new project with you.

I was visiting a friend the other day, and her daughter noticed my personalized license plate, "SCRPBKR." When she asked about it, my friend told her I was a famous (yeah, right ;) ) stamper and scrapbooker. The daughter got all excited, as she is quite the little artist herself. At the time, she was busy painting signs for a lemonade stand. They were really, really nice signs! (She has the gift!)

When the little girl asked me where I get my inspiration, I told her I get it just about anywhere, "For example, I see your signs for your lemonade stand using bright, bold, gorgeous colors, and I could totally see myself making a lemonade stand-shaped mini scrapbook with the Picnic kit from Club Scrap."  

Soooo, after I left their house, that thought just mulled over in my mind for a while until I came up with this:


I can't wait to show her! I plan to give her this adorable little album in the hopes she'll have photos taken while she's selling lemonade and put them in this album!!

To make your own, gather the following supplies:
Mat board
Picnic cardstock
Picnic rubber stamps
Picnic embellishments
Bookbinding glue
Waxed linen thread

Lemonade Stand "Frame"
1. To create the lemonade stand framework, cut the following pieces from mat board:


2. Glue the back edge of the "counter" piece to "back side of lemonade stand" piece using book binding glue. Let dry thoroughly before moving onto next step.

3. Glue "upper front section" to the front edge of the "counter" piece. Allow to dry thoroughly.

4. Glue the top edge of "back side of lemonade stand" to the back side of "roof" piece. Set aside to dry thoroughly before moving onto next step.

5. Glue the top edge of "upper front section" to the front side of the "roof" piece.  Let this dry. Here is what the final frame of the lemonade stand should look like:


Lemonade Stand Mini Album
1.  To create mini album, cut eight 3.5 x 10" pieces of cardstock, using all four colors from the Picnic kit.


2.  Fold each in half horizontally to create four 3.5 x 5" signatures.


3.  Pierce holes along the fold of each signature .5 and 1" from the top and bottom edges:


4. Stitch the signatures together using waxed linen thread. With first page in hand, thread waxed linen from the outside down into hole 1, come back up through hole 2, down through hole 3, up through hole 4. Add the second signature by stitching into the matching hole and repeat pattern. When you get to the last stitch, tie the loose thread ends together. Repeat stitching pattern with third folded page. When you get to the last hole of this page, do a kettle stitch. Repeat with fourth page. Tie off waxed linen at the very end.


(You can watch this video to see how to do the similar stitch, just without the ribbon and 2 fewer holes).


5.  Cut striped printed paper to 4.5 x 6" for front cover. Use bookbinding glue to adhere and wrap around the mat board.

6. Use bookbinding glue to adhere the first page of the album to the wrapped cover.


7.  Attach the last page of the album to the 'back side of the lemonade stand' mat board, under the 'counter.'


It should look like this:

8.  Trim three pink and two blue cardstock to 1 x 2" each. Round two of the corners as shown.


9.  Attach to the roof. (See below.)


10. Spritz Thickers letter stickers that spell "lemonade" and "25" with Lemon Zest ink spray. I used a "c" along with an apostrophe (cut in half) to create the "cents" symbol.


11. To make a banner from the checkered patterned paper, cut rectangular pieces to 1 x 1.5", then trim into triangles.
Attach triangles to white cord and adhere to the lemonade stand just below the roof line. Add gems to the roof line as shown:


12.  To further embellish, add stamped lemon slice and glass of lemonade, and use a marker to color counter top yellow.

Voila!


I hope you enjoyed this project. Thanks for joining me today!

Debbie Weller
http://debduzscrappin.blogspot.com/


Thursday, April 3, 2014

Hydrangeas Stitch Bound Book Project


Turn your Hydrangeas stitch bound project kit into a beautiful album with the help of just a few basic supplies. If this is your first handmade book, be sure to check out our essentials video on wrapping and this oldie but goodie on stitching.

You'll need the following tools and supplies:


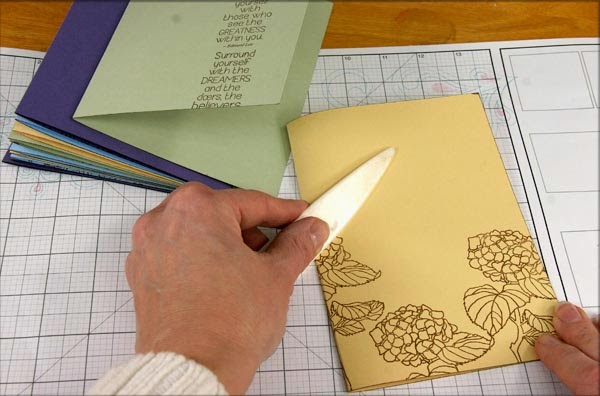
1. Spread bookbinding glue onto the book boards with a foam brush and center on the Purple Outside Covers. Burnish the paper onto the covers with a bone folder.


2. Use a scissors to trim away each corner at a 45 degree angle. Be sure to leave at least 1/8" paper beyond the tip of the book board corners.


3. Use a bone folder to pre-wrap the paper flaps around the boards. Brush glue onto the long flaps.


4. Burnish the long flaps onto the boards with a bone folder.


5. Tuck in the paper at each corner with the tip of the bone folder.


6. Adhere and burnish the short flaps.


7. Ink the edges of the White cutapart from the Embellishment Pack and attach to the outside front cover. We did not use this piece in the pre-assembled scrapbook pages. Alternatively, use a photo or other handmade element to decorate the book cover.


8. Fold each of the twelve inside pages in half. Decorate the pages with stamped images, if desired.


9. Use a paper piercing tool, ruler and cork board to pierce stitching holes along the crease of one folded inside page at .75, 2, 2.75, 4.25, 5 and 6.25".


10. Nest the pierced page on top of several additional pages and pierce holes in the same locations. Repeat until all pages are pierced.


11. Trim two 4" lengths of ribbon.


12. Cut the remaining length of ribbon in half.


13. Stack the pierced pages in the desired order. Be sure to maintain the orientation and order of the pages as you stitch them together, especially if you have decorated the pages with stamped text.


14. Thread needle with the waxed linen thread provided. Enter the top stitching hole from the outside to the inside, leaving a 4" thread tail. Stitch in and out of each hole until you reach the bottom of the page. Place the 4" lengths of ribbon beneath the long stitches on the outside of the page. You may find it helpful to tape the ribbon in place on the front of the page. This will help you keep track of the front of the book, as well. (Kay chose not to tape the ribbons down; she's that good.)


15. Remove slack from thread and close the first page. Place the second page beneath the first; enter the nearest stitching hole.


16. Stitch in and out of each hole until reaching the top of the page. Be sure to stitch over the ribbons.


17. Tie the thread tail from the first page to the working thread in a double knot to secure the first and second pages together.


18. Stack the third page beneath the first two. Enter the top hole and stitch back down to the bottom. Note: Always remove slack from thread, or the book will be "loose and wobbly."


19. When reaching the bottom, bring the needle beneath the stitch that connects the first and second page. Pull the thread until a small loop is formed.


20. Bring the needle through the loop and pull tight to perform a "kettle stitch."


21. Stack a fourth page beneath the third, enter the nearest pierced hole, and stitch back to the top. Perform a kettle stitch, stack another page, and stitch back to the bottom. Repeat until all pages have been secured.


22. Perform a double kettle stitch to secure. Trim the thread, leaving a 3" tail.


23. Tack the thread tails and ribbons to the outside of the book with tape or bookbinding glue.


24. Place the wrapped book covers on your work surface, being aware of the orientation, especially if the covers are decorated. Glue the ribbons to the outside left and right edges of the covers. "Type A" folks, use a ruler to find the center of the cover.


25. Brush glue onto the outside of the stitched pages and attach to the covers. Burnish the page onto the cover.


26. Tie the ribbon and trim.


Congratulations!! You've finished the book. We've sized it perfectly to hold 4x6 photos. You can take it from there . . .


Special thanks to Kay Williamson for taking the gorgeous photos while creating the book!

Tricia