Hello to all my Club Scrap friends! KnitterPam here. Wow, what an honor to have been contacted by Club Scrap and asked if I'd create some cards from the January '14
Graffiti kit!
Although it was fun researching and collecting ideas, getting started proved difficult. After thinking about it for a bit, I decided to just make some "art" first. It's so fun to pull out supplies and just mess around. I figured if the art backgrounds turned out alright, it would spark some ideas. Luckily, that is exactly what happened. Once I started "arting" (as Julie Fei-Fan Balzer calls it), the ideas came fast and furious.
I used the
Graffiti Greetings to Go as the base for all of my designs. Want some details?
The matte on this
Thank You card was embossed with a brick design and inked with
Earth Hybrid Ink. I cut slits on either side of the sentiment with a craft knife and slid the ribbon underneath.
The "Art" card background is
Raven ink sprayed on the
Adobe (2010) stencil onto white plain. I added the printed Cutapart sentiment bordered with the thin pink ribbon included in the
Greetings to Go pack.
I still had some Raven ink spray left on my stencil, so I pressed the 8.5 x 11" White Smooth Print paper onto it. The result was a reverse stencil imprint with some lines and some ink blops (my technical word) that was the perfect background for the Great Job card.
For the
Congratulations card, I cut slits on either side of the sentiment to create a channel for the ribbon, and added four quadrants of color as a matte.
For this
Thank You card, I pulled out my trusty Art Spinner ala Tricia's lovely Spin Class from a past Retreat. (Check out the video
here.) I used Hybrid re-inkers and spray inks dribbled into the spinner. Fun!
This birthday card features an
Adobe (2010) image stamped and embossed with that yummy
Tribal Hematite Embossing Powder on Black Plain. I used it as part of the matte, covering the seam with various ribbons from the
Embellishment Pack. I also added four little square orange brads in the corners.
Here I tried Tricia's cool
brick/embossing technique with
Musical Interlude Red from my stash and
Tribal Hematite embossing powder. I added a bit of ink spray to the stamped sentiment, and finished off the card with that delicious HUGE striped ribbon and a few square brads.
The Good Luck card features more Hematite-embossed Adobe stamp pattern, as well as some faux stitching on the banner using a black pen.
Here I stamped the
Graffiti Art Nouveau noise pattern on one side of the orange matte, flipped it over and ripped it back a bit, and sealed it down with a rolled scallop-y flower made out of that wonderful blue paper! I think in
Tribal Red (I'm going to have to hit GHM for more!), the flower would look like a carnation or dianthus, don't you think?
This card was very simple - I just punched circles of various sizes, stamped assorted Graffiti images with India ink and attached them to the front panel. I drew swirlies on the smallest pink circles with a white opaque pen and attached them with foam adhesive. I also drew a little swirlie at the bottom left of the quote with a Pitt pen to hide a mistake, just because I wanted to.
For this card, I colored in the Love stamps using blue and yellow Gelatos with a blending pen and water, sprayed with blue and yellow ink sprays, and added more of that lovely striped ribbon with a button.
The Yay, You! card background was created with pounces of Neon Ink Dabbers, stamps, along with some gems, a bit of washi tape and striped ribbon from my stash. I added dots to the arrow stamp with a white opaque pen after seeing Tricia do it. CASE!
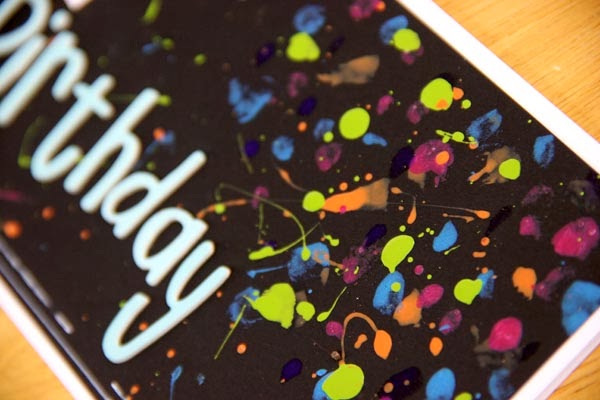
Can you guess the art medium on this Birthday card? It's NAIL POLISH! I tried several mediums, but none would show on the black. So I whipped out my kiddos' nail polish collection and pounced it around on the matte, with hand-drawn lines in white opaque pen around the edges. Love the effect! The sentiment was created from stickers and Thickers from my stash, but I think this card would also look neat with embossed CS Font stamps or alpha stickers, too.

This
Love card might be my favorite of the whole bunch. The night before I made this card, I took my 11-yr-old daughter to a friend's birthday party and one of the cards she received was EXACTLY what I had in my head for
Graffiti. So I took a picture of the card, and went home and re-created it with my CS
Graffiti supplies. The Art Nouveau noise image was stamped multiple times using a bit of water and assorted
Gelatos. The crown was stamped with India ink and topped with a few
Glitter Brads included in the Greetings to Go pack. The tailed hearts were stamped with
Ash Hybrid ink, and colored with pink Gelato. I stamped the word "Love" with India ink onto a scrap paper. To create the "fill" design, I randomly stamped over the word with an older CS music stamp (yes,
Musical Interlude again) and swiped my CS Neon Pink ink pad over the top. I also stamped the "Trust . . . " sentiment with India ink onto a scrap, cut out the individual words, inked the edges and adhered them to the front of the card. So much fun! I love the result.

And last, but not least, my other "favoritest" card. I wanted to show y'all that Graffiti doesn't have to be wild and crazy. The little elongated inchie panels remind me of an art gallery. I drew over the matted patterned paper squares with Liquid Pearls in a rosy color. Add simple glossy black photo corners and voila, a classy Graffiti card that you could give to anyone.
I hope you enjoyed the walk-through of my
Graffiti card designs and that this hasn't turned out to the be world's longest post. Oh, who am I kidding? Have you ever known me to be short-winded, my friends? Thanks for the opportunity, Club Scrap - it was really fun showing off different ways to use the
Graffiti kit to make cards.
Pam Butler (aka KnitterPam)
********************
Greetings to Go Guest Artists are given the current month's Club Scrap materials to work with:
- Greetings to Go Pack
- Embellishment Pack
- Collection Unmounted Rubber Stamp sheet
- Greeting Unmounted Rubber Stamp sheet
- Art Nouveau Unmounted Rubber Stamp sheet
- Extra 8.5 x 11" plain papers from the monthly kit
The artist may also choose to incorporate items from their own craft stash, as well as different inks and art mediums. We do our best to make note these additions in the card descriptions whenever possible.