Showing posts with label Project. Show all posts

Wednesday, September 10, 2014

Blueprints Home Folio Part 2--Tutorial

I was pleasantly surprised by the excellent feedback I received on my Blueprints Home Folio post last week. I used it over the weekend when we were shopping for supplies for the remodel. The handy 6x8" size fit perfectly into my purse, making it easy to tote around.


A few people asked how it was made, so I thought I'd share. It's a pretty quick and easy project, and it could be used for a number of different purposes. It all starts with  12x12" cardstock.

Folio Cover:
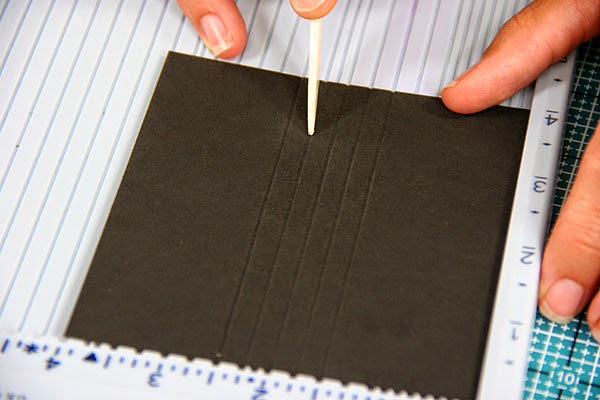
  1. Score vertically at 6".
  2. Rotate 90 degrees and score at 4".
  3. Scoring and cutting diagram.
  4. Use scissors to trim approximately 1/8" on the left and right sides of the vertical fold, stopping at the 4" horizontal score line. Remove strip. (This will eliminate extra "bulk" when the folio closes.)
    Trim excess from center pocket area.
  5. Fold along the 4" score line. Use a punch or Corner Chomper to round the edges of the inside pockets if desired.
    Round corners (optional).
  6. Add a 8" length of washi tape vertically along the left and right edges of the folio. This seals the edges of the inside pockets. 
Add washi tape to outer edges.
Inside Elements:
  1. Trim cardstock to 5.75 x 7.75" to create inside pages. (My folio has one, but you could add up to three.) Fold each inside page in half horizontally. 
  2. Did you know you can print your own from http://www.printfreegraphpaper.com/? I like the 1/5" Cartesian. Print the desired number of pages onto text weight paper and trim to 5.5 x 7.5". Fold in half horizontally.
  3. Nest all pages together into the folio, leaving equal borders around the edges of each layer. 
  4. Add an A6 envelope to the center of the nested pages; aligning the flap fold with the center fold of the inside pages. Pierce stitching holes through all layers, 2" from the top and 2" from the bottom edge of the folio cover.
  5. Use waxed linen thread and needle to pamphlet stitch the folio together. (Place threaded needle into the top hole, from the inside to the outside. Then place the needle into the bottom hole from the outside to the inside. Tie ends together. Trim excess thread.)
    Pamphlet stitch.
    Tie thread ends together and trim.
  6. Decorate cover and inside pockets and pages as desired.

    I think these little folios have lots of potential . . . how will you use yours?


    Creatively yours,
    Karen


    Friday, September 5, 2014

    Blueprints Home Folio


    In addition to papercrafting, another passion of mine is home improvement. My husband and I enjoy making our home "our own" through remodeling. I bore easily, so I keep things fresh by rearranging rooms from time to time. Early in our marriage (before kids), I rearranged the furniture so much my husband used to tell people he never knew what the house was going to look like when he got home!

    My "home improvement project" folio.
    When planning a remodeling project, it helps to be organized. We plan to remodel our kids' former "playroom" and to turn it into more of a family reading space/library. Planning and budgeting for this project inspired me to create this folio. Turns out the September Blueprints papers, stamps and cutaparts were perfect!

    Inside front cover pocket and stitched booklet insert. The inner pages offer plenty of space for sketching out ideas and making lists of materials and supplies needed for the project.

    The inner pages include graph paper for sketches and measurements.
    I added an A6 envelope in the center to provide additional storage.

    The envelope flap cleverly conceals the pamphlet stitch and keeps the contents from escaping.

    The inside back pocket is perfect for holding receipts, gift cards and more.

    Thanks to my folio, I'm feeling quite prepared and organized . . . now I just have to work on that budget!

    Creatively yours,
    Karen


    Tuesday, August 26, 2014

    Super Stacked Box Project

    Creative Greetings!

    Have you checked out the Stacked Box Project in the store? I'm crazy for projects of any kind, but I especially enjoy constructing these useful, "stuff"-storing, home decor boxes. I just can't help but brag a bit more about them. The boxes measure 5x7, 6.5x8.5, and 8x10". (All are 2" deep.)

    Stacked Box Project - Spine
    I have this one on my desk at home. It stores all kinds of odds and ends, including coupons and mail.

    Stacked Boxes Project
    I used all of the included materials: pre-cut wrapping papers, wooden feet and twill ribbon closure. All I added was some rubber stamping, a metal label holder, CS cutaparts, key charms and a mini tag from my stash.


    All embellishments were added after the boxes were constructed. Here are a few details:

    Big & Tall Numbers stamped with White Pigment and India Inks.

    Age twill ribbon with Earth CS Hybrid Ink. 


    Adhere the metal label holder to spine with Glue Lines.
    Attach metal key charms with waxed linen thread.


    Mini tag glued between cover papers.
    Lock & Key Cutaparts added to each box.

    As you can see, it's super-easy to embellish the project kit because the color scheme is so versatile!

    But if you like to do your own thing, the Components Kit is fun with all its infinite possibilities. I put the one pictured below together for the Oopsie Daisy Blog Hop. You can use any papers you like with the components kit!


    Thanks for stopping by. I hope your day is "stacked" with good fortune and fun!

    Kay at Club Scrap

    Monday, August 4, 2014

    Page-in-a-Pocket Album Instructions


    The Page-in-a-Pocket Album included in the CS Cinema collection is a quick project to assemble. Once you learn how easily it comes together, you'll want to make more!


    Supply List:
    Page-in-a-Pocket Album Kit
    Adhesive or CS Bookbinding Glue/Foam Brush
    Bone Folder
    Scissors or Craft Knife and Cutting Mat
    Envelope Punch Board
    Score-Pal
    Cinema Embellishment Pack

    1. Nest the "Now Showing" portion of the White Cutapart from the Embellishment Pack onto the 3.75x4" Black Matte included in the project kit and set aside.


    2. Score each Wine pocket page horizontally at 2.5 and 6.75" and vertically at .75".


    3. Place the Black Spine vertically into the Score-Pal and score at 1.5, 1.75, 2, 2.25, and 2.5".


    4. Move the spine 1/8" to the right, and add a score between each existing scoreline.


    5. Use a craft knife or scissors to remove the outer scored corners from each Wine pocket page. Cut along the inside of the scoreline to remove the line itself. This will allow the pocket page to function properly.


    6. Fold along scorelines and burnish with a bone folder.


    7. Glue or adhere the flaps to form the pocket.


    8. Fold the 3/4" flap along the scoreline to form the base of the pocket. Apply adhesive to the flap.


    9. Place the glued flap onto the non-seamed side of a second pocket, aligning the bottom edges.


    10. Continue to glue the remaining pockets together in the same manner.


    11. Adhere the final flap to secure.


    12. Apply adhesive to one 1.5" non-scored area of the Black spine.


    13. Place the glued area onto the stack of pocket pages, aligning the 1.5" scoreline with the left edge of the first page.

    14. Apply adhesive to the second 1.5" flap of the spine and attach to the back pocket page with the scoreline aligned with the edge of the back cover. There will be a gap between the edges of the pockets and spine.


    15. Center the nested cover panel onto the front page of the book.


    16. Place an Aqua page insert vertically on an Envelope Punch Board. Center the left corner onto the board and punch.


    17. Slide the paper left to the 2.75" measurement and punch.


    18. Use a scissors or craft knife to remove the strip of paper past the punched area to create a tab.


    19. Punch the upper right corner of each page with the corner rounding side of the punch. Repeat steps 16-19 for all Aqua page inserts.


    20. Flip every other Aqua page to alternate the direction of the tabs.


    21. Adhere the tab labels from the White Cutapart included in the Embellishment Pack to the tabs.


    22. Slide the Aqua page inserts into the Wine pockets.


    23. Decorate the cover, pockets, tabs, and inserts as you wish!


    The end. 

    We hope you enjoy this sweet little project. Be sure to share the results with us!
    Tricia