Showing posts with label Blueprints. Show all posts

Thursday, September 11, 2014

Digital Stencil Crackle Paint Technique, Part 1


Recently, Julie published a great blog entry on using crackle paint with stencils. Then, CS Member Norma posted a question in the forum asking if this could be accomplished digitally. Since I love a challenge, I thought I’d try this using Club Scrap’s Blueprints Digital Kit. Like many things digital, there isn’t any one right way, but I’ll show you how I achieved a similar look.

Although this isn’t difficult to do, it does require quite a few steps, so I’m only going to cover two parts today - creating the stencil, and creating a crackle texture. My next post (appearing later this month) will cover how to create a layout similar to Julie’s.

CREATE A STENCIL

1. Open 0914BlueprintsCSD_Overlay7.png.


2. Select the Magic Wand tool in the Tool palette and set the tolerance to 35. Make sure ‘contiguous’ is not checked.

3. Click in an empty area of the overlay. If you’re having trouble distinguishing the blank areas, add a new white layer under the overlay layer.

4. Select -> Inverse to select the letters.

Notice the 'marching ants' - that's what you want to see!
5. Fill with Black.

Voila! You've created a stencil!
6. Delete the white layer you created in step 3.

7. Save this as 0914BlueprintsCSD_Stencil.png so you can use it whenever you’d like.

CREATE A CRACKLE TEXTURE

1. Create a new document about 8 inches by 6 inches, with a white background.

2. Open a texture stamp; I used 0311RakuCSD_StampGraphic04.png.

You can use any image with an interesting texture, but Raku is rather crackly!

3. Using the Marquee Tool, select the portion of the image that you want.


4. Drag that portion of the image to your new document.

5. Duplicate and tile the image, repeating as needed to fill the canvas.
As is, the repeat is quite obvious, but you won't notice it once it's applied.
6. Delete the white layer.

7. Merge the layers together and save the file.

That's all for now. Remember, these digital stencils and textures can be used for a variety of techniques, so if you've got a chance to play with them, you might come up with some neat results!

Visit again later this month, and we'll use the components we made to create a cool crackle stencil layout.

Get crackin', and I'll see you soon!


 -Ron

Wednesday, September 10, 2014

Blueprints Home Folio Part 2--Tutorial

I was pleasantly surprised by the excellent feedback I received on my Blueprints Home Folio post last week. I used it over the weekend when we were shopping for supplies for the remodel. The handy 6x8" size fit perfectly into my purse, making it easy to tote around.


A few people asked how it was made, so I thought I'd share. It's a pretty quick and easy project, and it could be used for a number of different purposes. It all starts with  12x12" cardstock.

Folio Cover:
  1. Score vertically at 6".
  2. Rotate 90 degrees and score at 4".
  3. Scoring and cutting diagram.
  4. Use scissors to trim approximately 1/8" on the left and right sides of the vertical fold, stopping at the 4" horizontal score line. Remove strip. (This will eliminate extra "bulk" when the folio closes.)
    Trim excess from center pocket area.
  5. Fold along the 4" score line. Use a punch or Corner Chomper to round the edges of the inside pockets if desired.
    Round corners (optional).
  6. Add a 8" length of washi tape vertically along the left and right edges of the folio. This seals the edges of the inside pockets. 
Add washi tape to outer edges.
Inside Elements:
  1. Trim cardstock to 5.75 x 7.75" to create inside pages. (My folio has one, but you could add up to three.) Fold each inside page in half horizontally. 
  2. Did you know you can print your own from http://www.printfreegraphpaper.com/? I like the 1/5" Cartesian. Print the desired number of pages onto text weight paper and trim to 5.5 x 7.5". Fold in half horizontally.
  3. Nest all pages together into the folio, leaving equal borders around the edges of each layer. 
  4. Add an A6 envelope to the center of the nested pages; aligning the flap fold with the center fold of the inside pages. Pierce stitching holes through all layers, 2" from the top and 2" from the bottom edge of the folio cover.
  5. Use waxed linen thread and needle to pamphlet stitch the folio together. (Place threaded needle into the top hole, from the inside to the outside. Then place the needle into the bottom hole from the outside to the inside. Tie ends together. Trim excess thread.)
    Pamphlet stitch.
    Tie thread ends together and trim.
  6. Decorate cover and inside pockets and pages as desired.

    I think these little folios have lots of potential . . . how will you use yours?


    Creatively yours,
    Karen


    Friday, September 5, 2014

    Blueprints Home Folio


    In addition to papercrafting, another passion of mine is home improvement. My husband and I enjoy making our home "our own" through remodeling. I bore easily, so I keep things fresh by rearranging rooms from time to time. Early in our marriage (before kids), I rearranged the furniture so much my husband used to tell people he never knew what the house was going to look like when he got home!

    My "home improvement project" folio.
    When planning a remodeling project, it helps to be organized. We plan to remodel our kids' former "playroom" and to turn it into more of a family reading space/library. Planning and budgeting for this project inspired me to create this folio. Turns out the September Blueprints papers, stamps and cutaparts were perfect!

    Inside front cover pocket and stitched booklet insert. The inner pages offer plenty of space for sketching out ideas and making lists of materials and supplies needed for the project.

    The inner pages include graph paper for sketches and measurements.
    I added an A6 envelope in the center to provide additional storage.

    The envelope flap cleverly conceals the pamphlet stitch and keeps the contents from escaping.

    The inside back pocket is perfect for holding receipts, gift cards and more.

    Thanks to my folio, I'm feeling quite prepared and organized . . . now I just have to work on that budget!

    Creatively yours,
    Karen


    Thursday, September 4, 2014

    Stencil Crackle Paint Technique


    Crackle paint adds so much dimension and texture when paired with the Blueprints masking stencil. Check out these amazing results.


    Don't you just love how crisp and clean the edges are and all that wonderful crackled goodness?

    Grab some Blueprints papers, the mask and some crackle paint, and I will show you how it's done.

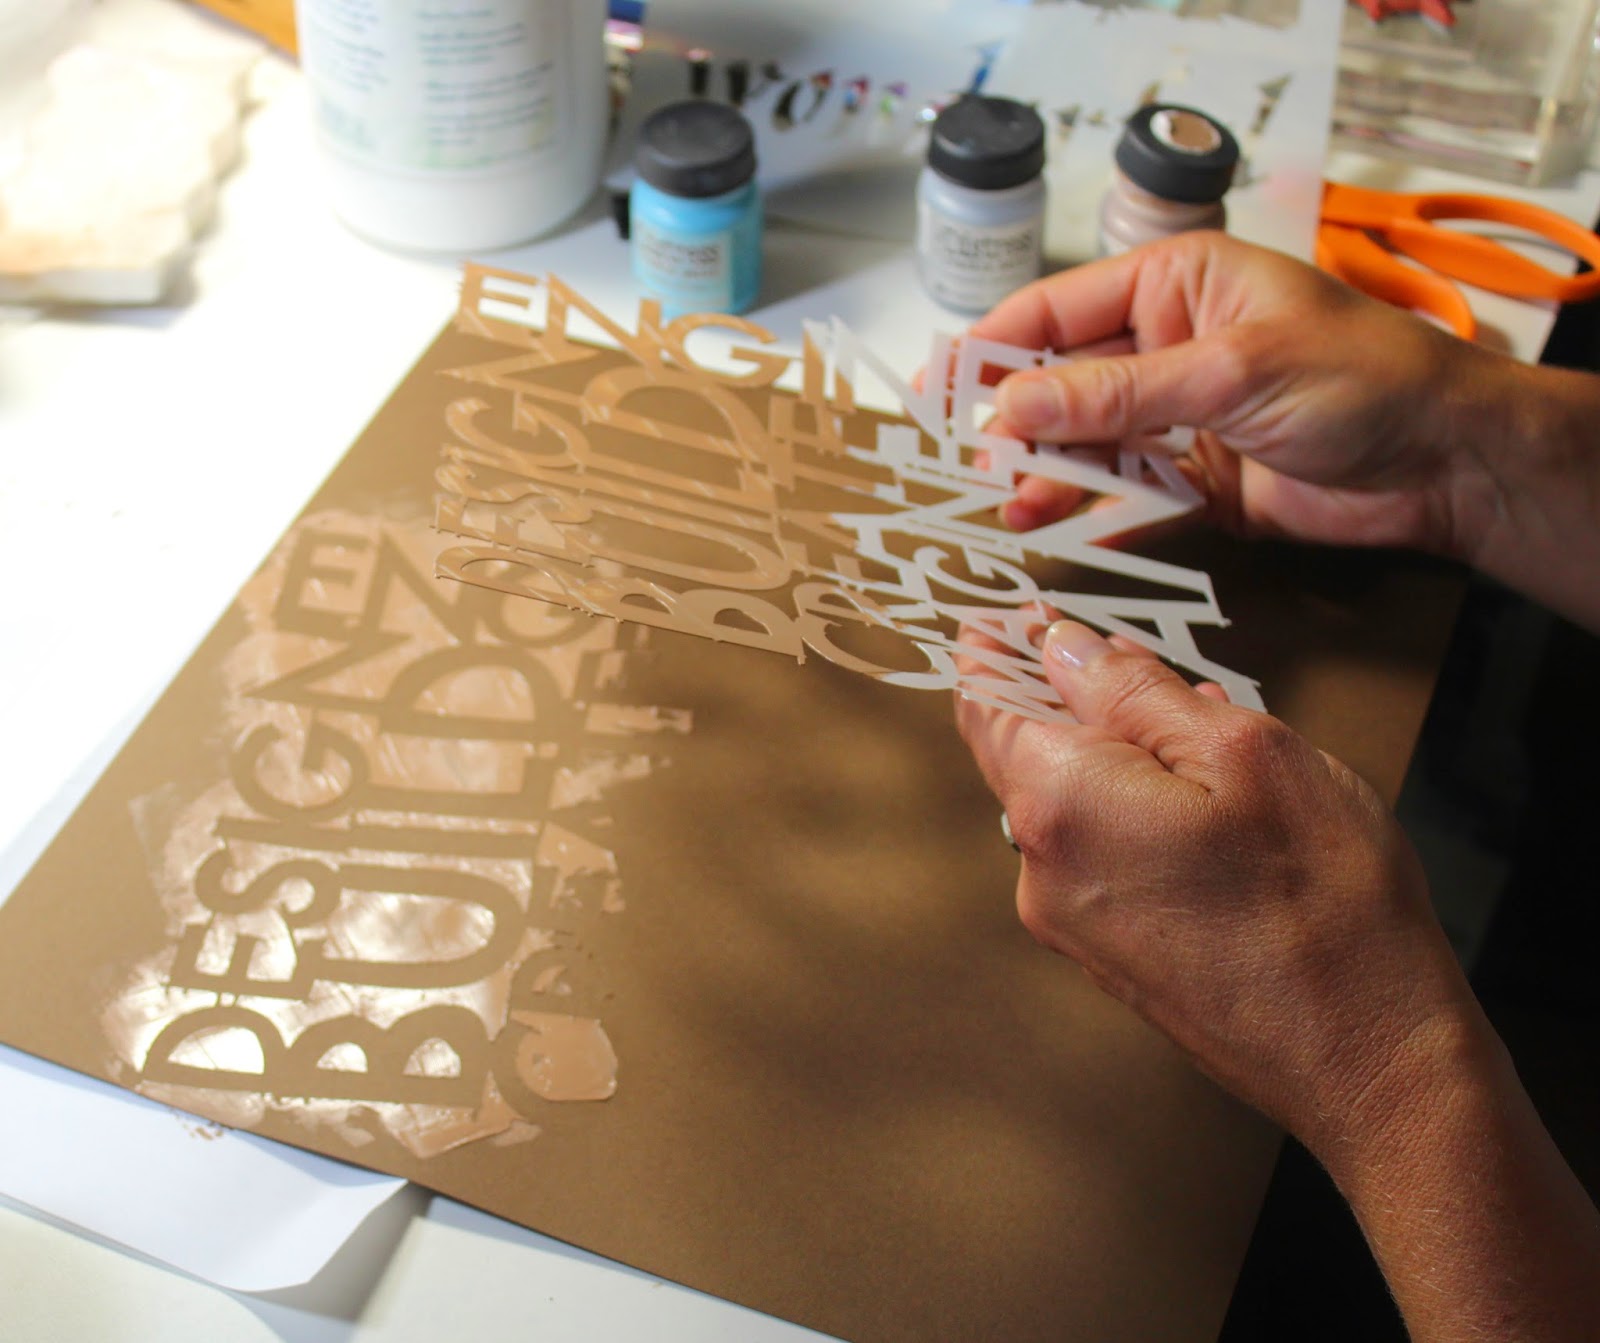
    1. Lay the masking stencil down onto brown paper. Paint over the stencil with the crackle paint.

    I used a complimentary color of brown - Distress "Vintage Photo" Crackle Paint from Ranger.
    2. Swipe over the paint using firm pressure and a scraping motion with an old credit card. This will spread the paint across the stencil and ensure proper coverage.

    Note: You don't have to use the entire image when painting on the medium. I chose to highlight certain words.
    3. Carefully remove the mask. Allow the crackle paint to dry and reveal the texture.

    Run the masking stencil under warm soapy water immediately to remove the excess paint.
    Now it's time to use this carefully crafted paper in a layout.

    Our daughter Shannon had fun helping us build this dribble sandcastle over the Labor Day weekend. Fits the theme quite nicely, don't you think?


    Stamp a gold photo mat, Kay Williamson style!


    Add crackle paint to the gold anchor strip, stamp a compass image border, and mat a clever quote to tie the two layouts together.


    Let's get cracking on those layouts!

    Julie

    Tuesday, September 2, 2014

    Blueprints Pages and Greetings to Go


    My brother Todd is an electrician, and I visited his job site today. I can't wait to add the photos of his incredible work to the layouts below. He was showing me plans for the home he was working on, and I noticed the architect used the same font we did!


    Let's take a look at a few of the highlights from the new Blueprints collection while you wait for your kit to arrive. Double click on any image to look at a larger version.

    Layouts 1&2
    I secured three metal filigree squares with gold mini brads onto three Blue mattes to add a bit of contrast to the page.
    Tie a bow to the grosgrain and staple the twill. Fibers add a lot.
    Layouts 3&4
    Fold the die cut jumbo photo mounting corners and secure with adhesive.
    Stamp the Blue corner with White Pigment ink and a UM stamp image.
    The kit includes a set of hinges and brads. Attach one half of the hinge to a cutapart and the other half to the base page to store hidden journaling or photos.
    Layouts 5&6
    I can see myself getting a lot of use out of this quote. It's pre-printed on the White cutapart and is also featured on the UM Borders & Backgrounds. The sketch font is perfect for coloring in if you want to make the words pop.
    Layouts 7&8
    Create a custom border along the left edge of the page with the dynamite masking stencil and White Pigment ink.
    The metal filigree squares are nice and flat, yet add so much.
    Layouts 9&10
    The green ribbon is a perfect match to the paper, and it's made of soft silk. You're going to love it.
    Begin with a 12x12 White Plain for a page base and enhance it with the masking stencil and coordinating inks.
    Layouts 11&12
    Add two hinges to the left edge of this cutapart and open accordingly.
    I used my new favorite UM stamp quote on a piece of White paper trimmed during the page assembly process.
    Two staples + two folded ribbons = sweet.

    Nest two strips of ribbon and staple each end twice. Instant embellishment!
    Layouts 13&14
    My favorite part about this layout is how I was able to nest two large and two small photo mattes onto the 12" Blue strip in the background with consistent spacing. It's such a lovely grouping.
    Whether you choose to follow along with the Greetings to Go inspiration and basic instructions we provide, or go your own way, this side order of fifteen cards and envelopes is always an excellent value.

    Group One: 3.5x5" Gold Cards with a double gate fold.
    Each card base is scored four time to create the clever folds.
    I'm very impressed with the detail that comes through on the compass stamped image featured on the UM Art Nouveau.
    Group Two: 4.25x5.5" Cards
    Trim a Green printed cutapart to create the squares on the background pane. The ribbon is a perfectly-matched blue satin.
    The corners were embellshed with the elegant Dazzle stickers included in the pack. 
    Group Three: 4.5x6.25 Brown Cards with Blue and Gold Panels.
    Jacqueline threw in this idea on the printed cutapart as a joke thinking we'd ask her to change the silly quote. But we kept it. I trimmed the hammer with a craft knife, popped it with foam adhesive and finished it with glitter glue. Every hammer should have a little sparkle.
    I'm sure you'll nail down a few great ideas of your own once your Blueprints kit hits your doorstep. Enjoy!

    Tricia