Showing posts with label Big Deal Scrap Rap. Show all posts

Thursday, February 27, 2014

Make your Own Digital Stencil - It's a Big Deal!


Last week, Kay showed off her amazing talents with some really cool techniques using the Big Deal stencil - if you missed them, click HERE and HERE to see both posts.

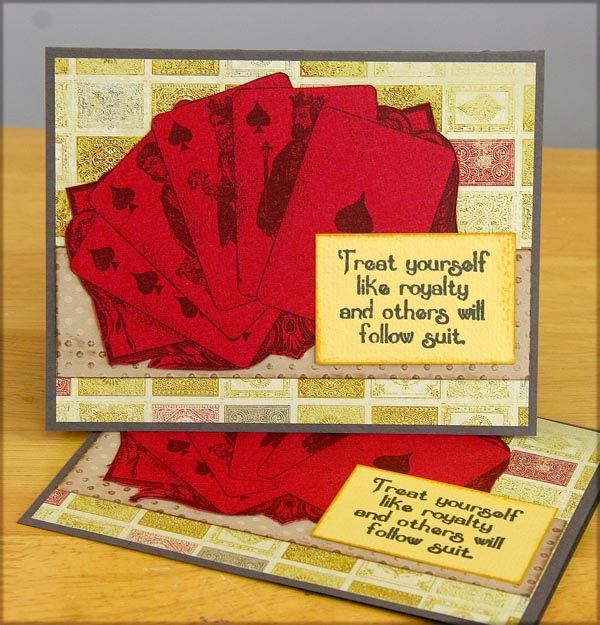
I was especially WOWed by this one:

We don't get a stencil in the digital kit, but that didn't stop me from creating my own and riffing on that amazing card! Let me show you how I did it using the Big Deal Digital Kit.

(To make this a bit easier, we'll break this down into a couple of different parts.)

Part 1: CREATE THE STENCIL

1. Create a new document in your program of choice (I'm using Photoshop CC). I made mine about 8 inches square and gave it a white background so that it would be easier to see what I'm doing.

2. Open 0214BigDealCSD_StampImages1.png.

3. Use the lasso tool to select the 'suits' background stamp and drag it onto your new document.

4. Duplicate the layer and drag the new layer over to the left, fitting it close to the first layer without overlapping any of the image.


5. Duplicate the layer again, dragging it to the right - we'll use this to fill in some gaps.


6. Use the lasso tool to select one of the suit graphics and drag it into one of the gaps. Continue until you're satisfied with the look.


Tip: You can also move parts of the graphic on the left to make everything fit together better. Feel free to rotate images as needed, too. Play until you think it looks good.

7. Use the marquee tool to select the unused images on the right. Press 'Delete' to remove them.


8. Merge all the layers except the white background.

9. Select the white background layer in the Layers Palette and delete it.

10. Save your stencil as a PNG (or PSD) file so you can use it as often as you'd like.

Part 2: CREATE THE CARD


1. Create a new document that measures 4.5" wide by 6.5" tall.

2. Open your stencil file and drag the stencil onto your new document.

3. Click-and-drag on a corner handle to make the stencil larger, so that it continues beyond the edge of the document in all directions.


Tip: Hold down the Shift key while you click-and-drag to maintain the proportion of the stencil.

4. Command-Click (Mac) or Ctrl-Click (Windows) on the thumbnail of the stencil layer in the Layer Palette. You'll see 'marching ants' around the graphic.

5. Select Edit -> Fill and choose white. This will turn the stencil white. Deselect the layer.

6. Create a new Layer UNDER the stencil layer and use the paint bucket tool to fill the layer with black.


7. Select the stencil layer and Command-Click (Mac) or Ctrl-Click (Windows) on the thumbnail of the stencil layer in the Layer Palette. You'll see 'marching ants' around the graphic.

8. Create a new layer ABOVE the stencil layer.

9. Select the brush tool and choose a medium-sized brush with fuzzy edges.

10. Select a color from the color Palette and 'paint' a portion of the stencil.

11. Repeat step 10, choose a variety of colors, until you're satisfied with the look.


12. Use the Marquee tool and select the card back graphic from 0214BigDealCSD_StampImages1.png and drag it onto the card top. Click-and-drag on a corner handle to make the stencil larger, so that it continues beyond the edge of the document in all directions. This will add a bit of 'visual texture' to the card.


13. Add a graphic and sentiment to complete the card panel.


14. Command-A (Mac) or Ctrl-A (Windows) to 'select all'; you'll see 'marching ants' around the perimeter of the window. Select Image -> Crop.

14. Select Image -> Canvas Size. Change the size to 5 x 7.

15. Add a layer or two of different colors and/or backgrounds, trimming as needed. Add small drop shadows to create a bit of depth.


That's it!

I hope you'll give this a try. It's really not difficult and you can produce some amazing results!

Until next time, thanks for stopping by!


-Ron

Monday, February 24, 2014

Big Deal's Club Stamp Cards

Your 12-pack of 8.5x11 papers and Red Pearl Bonus Panels included in the Big Deal Club Stamp collection will make fourteen nifty cards. Twelve are standard A2, and two are A7s. Let's begin with the trimming preparations.

1. Trim each 8.5x11 Text Weight Print vertically at 4.5 and 4". Cut each 4x11 horizontally at 5.75 and 5.25".

 2. Cut one 8.5x11 Tan Plain vertically at 7". Trim the 7x11 horizontally at 10". Cut the 1.5x11 horizontally at 10.5 and 5.25". Score and fold the 7x10 horizontally at 5".


3. Trim one 8.5x11 Yellow Plain vertically at 7". Cut the 7x11 at 10". Trim the 1.5x11 horizontally at 9, 7, 4.75 and 2.5". Score and fold the 7x10 horizontally at 5".


4. Score one 8.5x11 Tan Plain, one Grey Plain, two Red Plains and two Tan Prints vertically at 4.25". Cut each paper horizontally at 5.5". Fold each 5.5x8.5 in half to make a card base.


 5. Trim one 8.5x11 Grey Plain horizontally at 10, 7.25 and 5.25". Cut the 5.25x8.5 horizontally at 8 and 4". Trim the 2x8.5 horizontally at 8 and 4". Cut the 2.75x8.5 horizontally at 6.5 and 3.25". Trim the 1x8.5 horizontally at 4.25".


6. Cut one 8.5x11 Yellow Plain horizontally at 8.75 and 5". Trim the 5x8.5 horizontally at 7.5 and 3.75". Cut the 3.75x8.5 horizontally at 5". Trim the 2.25x8.5 horizontally at 8 and 4".


7. Trim one 4.25x6.25 Red Pearl Panel horizontally at 5.75 and 3". Cut the 3x4.25 horizontally at 4 and 2". Trim the 2.75x4.25 horizontally at 3.5 and 1.75".


Now that you have a big 'ole pile of pieces, the fun can begin!

The pre-printed text weight panels were stamped with the large images from the Collection UM sheet. I like how the transparency of the ink allows the pre-printed pattern to show through.

CS Ruby and India Black ink used.

The collection comes with a 5-pack of Red Pearl panels. Here, I stamped onto the dark red side and trimmed out the image. It's a fun combo with the quote.


I think this pair is my favorite. I used the large punch on the Crop-A-Dile to create tiny red circles from a scrap of the Red Pearl panel and attached them to the Bingo image with Bookbinding Glue. These cards appear to have lots of dimension but will mail nice 'n flat!


The White Pigment ink from Club Scrap did a splendid job transferring the nice detail on the UM image of the cards featured on the Greeting UM sheet.


This is where things got "dicey." The Tan Print helped these cards fall together in a shake. I used a cute heart-shaped brad to accent the "o" in "love."


There's something about a rounded corner that just makes me feel happy. And I love that neutral scroll image from the UM Borders & Backgrounds sheet. I'll be reaching for that one frequently.


I'm usually running out of steam by this point, but simply had to use that hysterical joker. I think it's the perfect card for my dad. I'll have to set that one aside. Note the pretty gold-laden sheer white ribbon we picked out for the set. Such a nice addition!


Time to get busy. Be sure you're playing with a full deck before you tackle the paper trimming!

Tricia

Friday, February 21, 2014

Fun with Club Stamp Prints!


Dear Club Stamp Members,

Your Big Deal Club Stamp Kit is on its way to you now!!!!!! I enjoyed using the small-scale prints so much, I simply had to post about it today.


Cards featuring Big Deal Club Stamp Print

First, a bit of prep before creating the cards: Cut one 8.5"x 11" text-weight print into 1" squares.


5x7" Collage Card
1. Use adhesive and grid ruler to adhere 1" squares in patchwork design onto a 4-1/4" x 6-1/4" matte, leaving 1/8" border.


2. Use Earth Ink to distress collaged artwork. Attach to 5"x7" card base.


3. Embellish with Big Deal Heart Brads and rubber stamped Collection UM sentiment.


4 1/4" x 5 1/2" Card, A2 Envelope Size Card
1. Matte 1" print squares onto 1-1/4" Red Pearl. Adhere to card base in a grid pattern.


2. Assemble two rows on the top and one row on the bottom.


3. Rubber stamp sentiment onto 1" x 3-7/8" strip and attach. Add Heart Brads as desired.


5" x 7" Border Strip Card
1. Matte five 1" Square Prints onto 1-1/4" Square Red Pearl. Adhere to a stamped 2 x 7" Yellow strip.


2. Use Earth Ink to highlight raised pattern on Tan card base. Embellish strip with heart-shaped brad and adhere to front of card.


I hope you'll receive your Club Stamp Kit soon. Have fun and enjoy it! Not a Club Stamp member? Sign up HERE!

Thank you for stopping to take a look.
Kay at Club Scrap