Showing posts with label Club Stamp. Show all posts

Wednesday, August 20, 2014

Cinema Card Formulas

Hey, Stampers!

The Club Stamp Cinema collection (shipping today) contains a dozen 8.5x11" papers, a super-sized unmounted stamp sheet, five silver charms and some beautiful metallic ribbon. Follow the cutting instructions to create a fun batch of thirteen cards leaving only a teenie tiny pile o' scraps!

(Double click on the images to enlarge.)

Thirteen cinematic-themed cards.
Papers trimmed to look like a film strip.
Save your bubble wrap for a card embellishment.
Clapboards adhered with foam adhesive add dimension.
Little "winged" origami envelopes hold stamped tickets.
Paper trimmers ready!

1. Trim one 8.5x11 Aqua Plain, Wine Plain and Stone Print horizontally at 5.5". Cut one 5.5x8.5 horizontally at 8 and 4". Trim one 4x5.5 horizontally at 5.25". Cut the other 4x5.5 horizontally at 3.75 and 2". Trim one 1.75x4 horizontally at 3.75, 3 and 1.5". Score and fold the remaining 5.5x8.5 horizontally at 4.25".


2. Cut one 8.5x11 White Text Print vertically at 4.5 and 4". Trim each 4x11 horizontally at 5.75 and 5.25".

3. Trim the other 8.5x11 White Text Print vertically at 4.25". Cut each 4.25x11 horizontally at 6.75, 5.5 and 4.25". Save the four 4.25" squares for the envelope origami technique shown below.


4. Score one 8.5x11 White Plain, Wine Plain, Aqua Plain and (2) 8.5x11 Black Plains vertically at 4.25". Trim horizontally at 5.5". Fold each 5.5x8.5 in half along the scoreline.


5. Trim the 8.5x11 Stone Print vertically at 7.5 and 4". Cut the 4x11 horizontally at 10.5 and 5.25". Trim the 3.5x11 horizontally at 9.5 and 4.75". Stamp the unmounted "G" image four times onto the plain side of the 1x11" strip with India Black ink.


6. Stamp four UM clapboard images and four UM ticket images onto one 8.5x11 White Plain with India Black ink. TIP: Be sure to work on a well-cushioned stamping surface to achieve the best image. Try a test image on scrap paper prior to stamping on the White paper. Allow the ink to dry and trim each image from the paper with a craft knife or scissors.


Fold the four 4.25" White Text Print squares into these adorable mini envelopes by following the steps provided in the video below. The tickets stamped and trimmed from the 8.5x11 White paper will fit perfectly within the envelopes.


With all of your papers trimmed, you're ready to stamp and complete your cards! Let's take a closer look at a few of them . . .

Stamp the "3," "2," "1" images with Ash ink, and the quote with India Black.

Use silver or white pigment ink to stamp onto the Wine panel, or emboss with white powder.
The small square of bubble wrap is attached with ATG tape. Stamp onto the plain side of the Stone panel.
There's plenty of silver metallic ribbon to wrap around the panels twice.
Stamp any greeting(s) within the clapboard image. 
The metal wing charms paired with the origami envelopes make a cute combination!
Pop in a movie and get started on your cards the moment your Club Stamp kit arrives. It'll make your day!

Tricia

Monday, July 21, 2014

Club Stamp Ships Today


Hurray, hurray, Club Stamp ships today!

I'm so glad there are more Oopsie Daisy papers and designs to share with the release of Club Stamp! I'm a big fan of the text weight print included in the kit, so I've crafted a gift box and bracelet using this paper.

Club Stamp Oopsie Daisy Papers
It's a great presentation when the gift and gift box match, right?

To make the bracelet . . .

1. Cut the 8.5x11 Text Weight Print into fourths and then into strips. Roll paper strips around anything that's approximately 1/8" thick to create beads. Fasten with Book Binding Glue brushed onto the last inch of the strip.


2. Thread paper beads onto elastic cord.


3. Tie a knot to secure and tuck ends into the beads.


To make the gift box . . .

1. Cut box base and lid from Book Board. The following dimensions were used for my box:

(1) 2-3/8x1-1/2" Box Base
(2) 2-3/8x2-1/2" Front & Back Walls
(2) 1-1/4x2-1/2" Side Walls
(1) 1-7/8x2-3/4" Lid Top
(2) 1/2x2-3/4" Front and Back Lid Walls
(2) 1/2x1-5/8" Side Lid Walls


2. Use Bookbinding Glue to attach Book Board pieces.


3. Refer to past Club Scrap projects and workshops for wrapping box with text weight paper. Use any method you like as long as the box is covered.


The four mini prints on one 8.5x11" make it so easy to give this little handmade box some character!


Club Stamp Oopsie Daisy Papers
I look forward to seeing what you'll do with your Club Stamp papers!

Kay at Club Scrap

Sunday, July 20, 2014

New Formulas for Oopsie Daisy

Hi, ya!

Shall we get some exceptional mileage out of our Oopsie Daisy Club Stamp collection? Our 12-pack of papers will make a beautiful batch of cards!


Before we get started, you'll have to do the "thinking" part. Let's get that out of the way.

1. Score one 8.5x11 Grey Print, one 8.5x11 Grey Plain, two 8.5x11 Green Plains and two 8.5x11 Caramel Plains vertically at 4.25". Trim horizontally at 5.5". Fold each 5.5x8.5 along the scoreline to create a card base.


2. Trim one 8.5x11 White Text Print vertically at 4.5 and 4". Cut each 4x11 horizontally at 5.75 and 5.25".


3. Oh, crap. What was I thinking?
  • Trim one 8.5x11 Text Weight Print horizontally at 10.5, 9, 7.5, 6.5, 5.5, 4.5, 3.5, 2, and .5".
  • Cut two 1.5x8.5 strips horizontally at 7 and 1.5". (Be sure the strips have different artwork.)
  • Trim two 1.5x8.5 strips horizontally at 7, 5.5, 3 and 1.5".
  • Cut each 1x8.5 strip horizontally at 5.5 and 3".
  • Fold each 1x3 piece in half. (You can stack up to four strips at a time.) Cut a "v" into the folded edge to create banner-style pieces.
  • If you like, punch a few daisies from the 1x2.5" pieces.


Here is the same cutting diagram superimposed onto the print.


If you are unsure about the cutting, this rescue video will help.


4. Cut one 8.5x11 Charcoal Plain vertically at 8, 5.75 and 3.5". Trim the 3.5x11 horizontally at 10.5, 7 and 3.5". Cut each 2.25x11 horizontally at 9, 6.75, 4.5 and 2.25".


5. Trim one 8.5x11 Charcoal Plain horizontally at 10 and 5". Cut each 5x8.5 horizontally at 7.5 and 3.75". Trim each 1x5 horizontally at 4". Cut the 1x8.5 horizontally at 8 and 4".


6. Cut one 8.5x1 Grey Print horizontally at 10.75 and 5.25". Trim the 5.25x8.5 horizontally at 8 and 4". Score and fold the 5.5x8.5 horizontally at 4.25".


7. Trim one 8.5x11 Grey Plain horizontally at 9.25, 7.25 and 5.25". Cut the 5.25x8.5 horizontally at 8 and 4". Trim each 2x8.5 horizontally at 8, 6, 4 and 2".


Now you can sort out the pile of wonderful pieces and turn them into some great cards!


Alternate the patterns of eight banner pieces onto the Charcoal panels.
Stamp the sentiment with White Pigment ink.
Staple a piece of ribbon to the lower left banner.

Stamp onto the patterned paper with a large daisy and India Black ink.
Add a punched daisy, if you like.
Place mini brads in each corner of the stamped Grey panel. 
These will make great anniversary cards!

Layer one each of four different 1.5" squares on the Charcoal square and add a matted sentiment.
Stamp and emboss the large framed image onto the Charcoal panels with gold powder.
Trim around the frame with a craft knife; cut around the daisy petal on the outside of the frame.
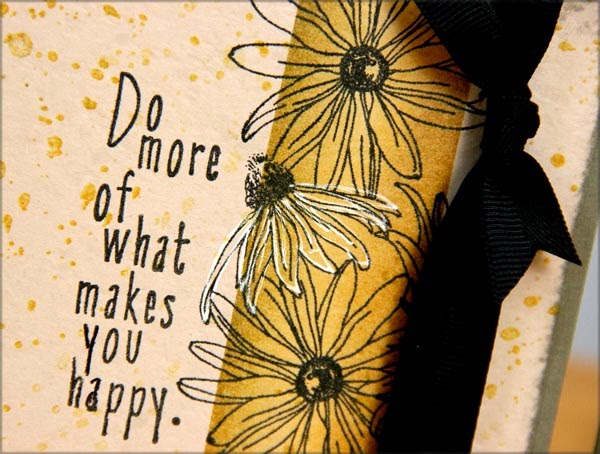
Mask a vertical and horizontal area of the Grey panels and sponge with Topaz ink to create a band. I used washi tape for my mask. I have a roll with a design I probably wouldn't use for anything else . . .
Stamp an image over the inked band. Outline with glitter glue.
Enhance one of the stamped daisies with a white gel pen and add ribbon.
Thirteen great cards from twelve sheets of paper.
That took some effort, but I think it was worth it! I hope you'll give it a whirl. But rest up and have some coffee first.

Tricia