Showing posts with label Handmade Box. Show all posts

Tuesday, August 26, 2014

Super Stacked Box Project

Creative Greetings!

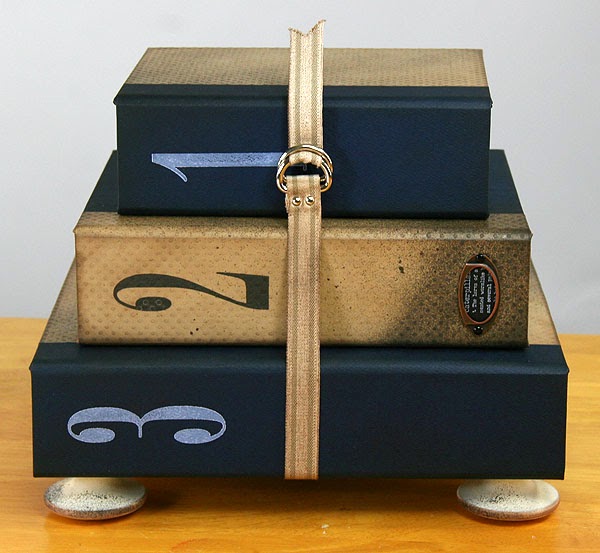
Have you checked out the Stacked Box Project in the store? I'm crazy for projects of any kind, but I especially enjoy constructing these useful, "stuff"-storing, home decor boxes. I just can't help but brag a bit more about them. The boxes measure 5x7, 6.5x8.5, and 8x10". (All are 2" deep.)

Stacked Box Project - Spine
I have this one on my desk at home. It stores all kinds of odds and ends, including coupons and mail.

Stacked Boxes Project
I used all of the included materials: pre-cut wrapping papers, wooden feet and twill ribbon closure. All I added was some rubber stamping, a metal label holder, CS cutaparts, key charms and a mini tag from my stash.


All embellishments were added after the boxes were constructed. Here are a few details:

Big & Tall Numbers stamped with White Pigment and India Inks.

Age twill ribbon with Earth CS Hybrid Ink. 


Adhere the metal label holder to spine with Glue Lines.
Attach metal key charms with waxed linen thread.


Mini tag glued between cover papers.
Lock & Key Cutaparts added to each box.

As you can see, it's super-easy to embellish the project kit because the color scheme is so versatile!

But if you like to do your own thing, the Components Kit is fun with all its infinite possibilities. I put the one pictured below together for the Oopsie Daisy Blog Hop. You can use any papers you like with the components kit!


Thanks for stopping by. I hope your day is "stacked" with good fortune and fun!

Kay at Club Scrap

Monday, July 21, 2014

Club Stamp Ships Today


Hurray, hurray, Club Stamp ships today!

I'm so glad there are more Oopsie Daisy papers and designs to share with the release of Club Stamp! I'm a big fan of the text weight print included in the kit, so I've crafted a gift box and bracelet using this paper.

Club Stamp Oopsie Daisy Papers
It's a great presentation when the gift and gift box match, right?

To make the bracelet . . .

1. Cut the 8.5x11 Text Weight Print into fourths and then into strips. Roll paper strips around anything that's approximately 1/8" thick to create beads. Fasten with Book Binding Glue brushed onto the last inch of the strip.


2. Thread paper beads onto elastic cord.


3. Tie a knot to secure and tuck ends into the beads.


To make the gift box . . .

1. Cut box base and lid from Book Board. The following dimensions were used for my box:

(1) 2-3/8x1-1/2" Box Base
(2) 2-3/8x2-1/2" Front & Back Walls
(2) 1-1/4x2-1/2" Side Walls
(1) 1-7/8x2-3/4" Lid Top
(2) 1/2x2-3/4" Front and Back Lid Walls
(2) 1/2x1-5/8" Side Lid Walls


2. Use Bookbinding Glue to attach Book Board pieces.


3. Refer to past Club Scrap projects and workshops for wrapping box with text weight paper. Use any method you like as long as the box is covered.


The four mini prints on one 8.5x11" make it so easy to give this little handmade box some character!


Club Stamp Oopsie Daisy Papers
I look forward to seeing what you'll do with your Club Stamp papers!

Kay at Club Scrap

Friday, October 18, 2013

More Baby Wipe Action

Having yet more fun with Club Scrap Projects & baby wipes!

Hopes Musical Hope Chest Project
We are all busy work-shopping and such at the Club Scrap Retreat this weekend, but I still wanted to share what I crafted earlier this week! Karen started it with last Monday's Inky Technique and Challenge, now it seems we've all been enjoying showing our baby wipe usage in crafting lately. So I've jumped on board with that it seems.

I do like how handy baby wipes are for applying acrylic paint onto my Club Stamp Projects! For this Hopes Musical Hope Chest Components Kit, I wrapped the box with plain old copy paper, then added acrylic paint using..of course..a baby wipe.

Start with wrapping the project with copy paper.


Add acrylic paint by rubbing it on using a baby wipe. The moisture in the baby wipe helps the paint spread easily. 


Follow up by using Club Scrap Stencils. Again use a baby wipe to apply the acrylic paint.


Hoping you'll give this a try if you haven't already!

Thanks for stopping by!
Kay here at Club Scrap

Wednesday, October 16, 2013

Handmade Gift Idea: Boxed Journal Set

I hope you'll forgive me for today's rather simple post. Tomorrow starts our 2013 October Retreat, so I'm pretty busy working on a few final details before our guests arrive.

As usual, I've been stalking browsing Pinterest regularly. I really need to DO some of the things I've pinned, rather than just saving the ideas "for a rainy day". Well, today was a very rainy day, so I decided to try one of the 6,518 (gulp) items I have pinned.

I decided to tackle this boxed set of composition notebook journals I saw on Weekly Scrapper. I already had a few composition notebooks purchased at back to school time and the Pattern Basics papers made coordinating everything simple. It was an easy project with big impact.

Four composition notebooks with new Pattern Basics covers.
I wrapped the covers of the composition notebooks with Pattern Basics Neutral papers. From there, I just needed a box, so I grabbed a Lucky Charms box from my son the second he emptied it at breakfast. A few cuts with a craft knife, a quick wrap with the Neutral papers, and I had a cheap, perfectly-coordinated storage box.


A metal label holder attached with brads adds a nice finishing touch.


I hope this quickie project inspires you to create a few simple handmade gifts for the upcoming holidays.

Until next time,
Karen

Tuesday, October 8, 2013

Handmade Box with Handle Instructions


I saw a cute little handmade box on Pinterest, and thought it would be neat to re-create it with an origami-style construction. The little ribbon handle is so adorable! Imagine all of the different paper/color/ribbon combinations you can use!

As long as you begin with two squares of paper, you can create any size box. 

1. Trim Pattern Basics Neutrals to 8x8" (lid) and 7.75x7.75" (base).


2. Use a grid ruler and pencil to locate the center of each square.


3. Fold the four outside corners to the marked center. Burnish all folds with a bone folder.


4. Fold each straight edge to the center.


5. Unfold each paper and make four vertical cuts along the innermost creases, stopping when you reach the square in the center.


6. Fold in the left and right side walls, and turn in the tabs to form a 90 degree angle.


7. Bring the remaining side walls up and over the tabs. Secure with adhesive. The lid should slide snugly onto the base.


8. Use a Crop-A-Dile or Japanese Screw Punch to punch holes in two sides of the base and corresponding top of the lid. Reinforce holes with eyelets. I had to use a combination of eyelet setters and the Crop-A-Dile to set the eyelets.


9. Thread ribbon into one side of the base, through each hole in the lid, and then back out the other side of the base. Allow enough slack in the ribbon so the lid can be lifted.


10. Tie a knot in each ribbon at the box base. Cute as can be!!! The wee box measured 2.75x2.75".

It's never too soon to get a start on your holiday box-making!

Enjoy!
Tricia