Showing posts with label baby wipe technique. Show all posts

Tuesday, February 18, 2014

Big Deal Stencil Techniques--Part Two


On yesterday's post, I shared two stencil techniques for the Big Deal Lite stencil. Are you ready for two more? (If you followed the preparation steps outlined in yesterday's post, you should still have one black and one white panel left.)

Ombre Ink Technique

1. Use a foam tip applicator and dye inks to add a variety of color to the painted black panel.


2. Rubber stamp the panel with India Black Ink and small text image.

Text stamp from Up, Up & Away CS UM
3. Add a stamped greeting and layer the panel onto a 5x7" card base.


Gelato Baby Wipe Color Infusion

1. Color the white paint on white panel with Faber-Castell Gelatos.


2.  Activate and spread color with a water brush.


3. Use a moist baby wipe to remove excess color from the painted stenciled shapes.


 4. Stamp sentiment onto the panel and layer onto a coordinating matte and 5x7" card base.

Sentiment stamp from Big Deal Greeting UM

I hope you enjoyed all four of the stenciled background techniques. Which one do you think you'll try first? Leave me a comment below!

Enjoy,
Kay at Club Scrap

Monday, October 28, 2013

New Inky Technique Challenge Wrap Up and Winner!!

Good Monday Morning everyone!!

First of all thanks so much to everyone who joined us for this fun challenge!

If anyone missed out, you can look back to Karen's original post HERE.

We were amazed at all the gorgeous artwork that was contributed. Here is just a sampling.


Julie


And now without further ado, Karen is joining me today to announce the winner!!

********************************************************************

Karen here...happy Monday! Julie and I were thrilled at the number of crafters who gave this new technique a try. Everyone's work was awesome!

Using random.org, we randomly selected a winner from among the sixteen submissions. The winner is entry #12, Ann...congrats Ann!

Ann's prize is a set of three Club Scrap Hybrid Re-inkers to play with.

I'm already looking forward to the next Linky Challenge, I hope you are, too!

Creatively yours,
Karen

Friday, October 18, 2013

More Baby Wipe Action

Having yet more fun with Club Scrap Projects & baby wipes!

Hopes Musical Hope Chest Project
We are all busy work-shopping and such at the Club Scrap Retreat this weekend, but I still wanted to share what I crafted earlier this week! Karen started it with last Monday's Inky Technique and Challenge, now it seems we've all been enjoying showing our baby wipe usage in crafting lately. So I've jumped on board with that it seems.

I do like how handy baby wipes are for applying acrylic paint onto my Club Stamp Projects! For this Hopes Musical Hope Chest Components Kit, I wrapped the box with plain old copy paper, then added acrylic paint using..of course..a baby wipe.

Start with wrapping the project with copy paper.


Add acrylic paint by rubbing it on using a baby wipe. The moisture in the baby wipe helps the paint spread easily. 


Follow up by using Club Scrap Stencils. Again use a baby wipe to apply the acrylic paint.


Hoping you'll give this a try if you haven't already!

Thanks for stopping by!
Kay here at Club Scrap

Monday, October 14, 2013

Baby Wipe Technique Challenge

Good Monday Morning!
Baby Wipe Technique Challenge!

This past Wednesday Karen kicked off, what I hope will become a more frequent style of challenges at Club Scrap. The Baby Wipe Technique looked like so much fun and we couldn't wait to see all of the fun artwork you came up with on your own. 


Here are some photos of my process.

Create a Baby Wipe ink pad using Club Scrap Metallic Re Inkers in Gold, Blue, Purple, and Green.
Use clean Baby Wipe dipped into ink pad to create interesting backgrounds.
Use an acrylic block to add blocks of color.  Stamp the inked block onto the paper.
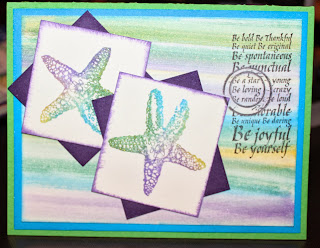
Use Fossils shell, Dream in Color swirl, Castaway starfish stamps.
Peacock papers matched the Metallic Re inkers perfectly.


Thanks for stopping by today and hoping you will still get a chance to play along as we are extending the challenge until Monday October 28th.   Post a link to your artwork on Karen's blog post HERE using the INLINKZ tool and I will draw a winner from the list of participants.


Julie


Wednesday, October 9, 2013

New Inky Technique and a Challenge!

I love trying new techniques. I rarely have time to do so, but I do love it. While Skype-chatting with my pal Julie the other day, she sent me a link for a crafty technique featuring the humble baby wipe. I had to give it a try.


Baby Wipe Technique

My "baby" is twelve years old, so we don't normally keep baby wipes around the house. I do keep them on hand for crafting though . . . mostly for clean up. I have to admit, this is the first time I've used a wipe as a "tool" or "medium".

I have to warn you . . . you WILL get messy. You need to be "okay" with having multi-colored fingertips after trying this technique. Thankfully, I'm totally okay with inky fingers because it's evidence of "play" time!

Gather your supplies: You'll need baby wipes (of course), some re-inkers (3-4 colors that coordinate nicely), and white or light-colored cardstock. I found cardstock with a nice smooth finish is best for this; too much texture and the ink gets "muddied", which, by the way, is NOT the look you're going for, as it can be very unattractive. Grab some stamps, too. Solid stamps, rather than "outline" stamps, are needed to really showcase the awesomeness of this technique.

Fold a single baby wipe in fourths, or if you're using larger stamps, layer 3 or 4 baby wipes together. I highly recommend placing the wipe(s) on a non-porous surface for easier cleanup. (Yep, that came from experience, folks.)


Squeeze a small amount of each color re-inker onto the wipe. I used four colors: Amethyst, Leaf, Moss, and Sapphire, and let the colors just touch each other. Essentially, you're creating your own custom ink pad, that happens to be disposable, too.


Stamping:
Press a solid stamp image onto the wipe, inking it thoroughly. Stamp image onto paper. Repeat as desired.


Create backgrounds:
Use a second crumpled up baby wipe to gently lift color from the original inked wipe. Sweep color across a cardstock panel to create a striated look.


Or, to create a mottled background (very Monet-looking), gently tap the crumpled wipe onto cardstock in a random fashion.

Once I started, I couldn't stop. I made a few more cards using this very cool technique. The sentiments are inked with the CS India Ink pad, as you want something waterproof when stamping over the ink/baby wipe combo.

Amethyst, Leaf, Moss, Sapphire
Amethyst, Moss, Topaz
Amethyst, Leaf, Moss, Sapphire


Ruby, Topaz, Earth


Now for the "Challenge" part: Julie and I challenge YOU to give this technique a try. Take a pic of your creation(s), and use the linky tool below to share it here on the blog.  **CONTENT EDITED** On Monday, October 28th, Julie will randomly choose one lucky participant, and announce the winner on her Monday blog post. (Quickie tutorial on how to use InLinkz. If linking from the Club Scrap Community Galleria, please use the browser window link thanks!!)


I can't wait to see your creations!

Creatively yours,
Karen