Showing posts with label Peacock. Show all posts

Monday, October 14, 2013

Baby Wipe Technique Challenge

Good Monday Morning!
Baby Wipe Technique Challenge!

This past Wednesday Karen kicked off, what I hope will become a more frequent style of challenges at Club Scrap. The Baby Wipe Technique looked like so much fun and we couldn't wait to see all of the fun artwork you came up with on your own. 


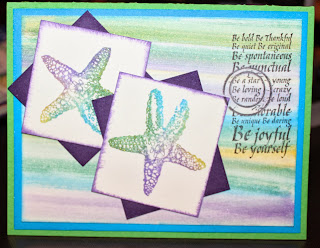
Here are some photos of my process.

Create a Baby Wipe ink pad using Club Scrap Metallic Re Inkers in Gold, Blue, Purple, and Green.
Use clean Baby Wipe dipped into ink pad to create interesting backgrounds.
Use an acrylic block to add blocks of color.  Stamp the inked block onto the paper.
Use Fossils shell, Dream in Color swirl, Castaway starfish stamps.
Peacock papers matched the Metallic Re inkers perfectly.


Thanks for stopping by today and hoping you will still get a chance to play along as we are extending the challenge until Monday October 28th.   Post a link to your artwork on Karen's blog post HERE using the INLINKZ tool and I will draw a winner from the list of participants.


Julie


Wednesday, November 14, 2012

Peacock Purse Mini Book


Hi, everyone...I'm Roni Johnson!

Recently, I was lucky enough to work with the Peacock Club Stamp Kit and the Doubly Proud Brag Book Project. Well, not usually one to follow directions, I always try to see if I can take pieces of a kit and switch things up a bit to create something totally new. This kit is no different. As you will see, I departed from the original instructions of the Doubly Proud Brag Book and instead turned it into a fun and functional Purse Mini Book!


Supplies: 
Peacock Club Stamp Kit – Unmounted Stamps & Paper
Peacock Club Stamp Stampers’ Project – Doubly Proud BragBook
Fibers
Velcro
Stickles Glitter Glue
Ink
Adhesive
Book Binding Tape (Optional)
Paper Piercing Tool and Cork Board
Scor-Pal or Score-it Board (Optional)
CS® Grid Ruler
Bone Folder
Scissors

Instructions:
1. First, pull out all of the matte board pieces of the brag book. You will notice there are five pieces – three large book covers, and two smaller pieces meant for the binding area.  


Set aside all of the pieces except one book cover piece. Cut this piece of chipboard in half, so it measures approximately 2 x 3-1/4”. (You won't need the second half…save it for another project.)


2. Now you have all of the pieces to create your purse book. Trim one Purple Plain to 4-1/2 x 11” and a second piece to 4-1/2 x 6”. Glue these two pieces together lengthwise to sufficiently cover your book.  (Allow about a 1-1/2” overlap at the joint.)

3. Arrange matte boards onto the cardstock as shown below, leaving about a 1/8” to 1/4” gutter between each matte board.

(Notice I added book binding tape where each section will be creased.  This adds strength to high-wear areas of your book.)
4. Notch the cardstock at each joint of the book, as shown below. Add your favorite adhesive to each tab and fold over, wrapping around the matte board.  


5. Cut a strip of Red Plain to 3-1/4 x 11”. Stamp Feather images in a random pattern. Glue this strip to the inside of the cover, hiding the notched areas. Crease at each fold, and set the purse cover aside for now.


Creating the Book Pages
To create the book itself, you’ll be creating several “signatures” (or sets of pages) for your book, using the pieces included in the Doubly Proud project kit. Some signatures will only contain one sheet of cardstock, which serves a purpose discussed in more depth later.

Assemble the signatures as follows:

1. Fold the strip of red pre-cut cardstock in half – this will be your center signature. 


2. Take two strips of Blue and one strip of Green, and stack them Blue/Green/Blue. Fold in half and crease. This forms a second signature.


3. Take two strips of Green and one strip of Blue, and stack them Green/Blue/Green. Fold in half and crease. This makes a third signature.

4. Score the remaining strips of Blue and Green horizontally at 2-3/4” and 5-1/2”. Fold the shorter flap in and then fold in half. (You now have six single-page signatures, each with a "fold out" flap.) Use a paper piercing tool and cork board to pierce stitching holes into the fold of all nine signatures, 1/2" from the top and bottom edges.


5. Instead of stitching the individual signatures to the spine of the book as in the Doubly Proud Brag Book instructions, we will use a strip of cardstock as the foundation. Cut a 3 x 9” strip of Purple Plain (or use the pre-cut strip of purple from the project). Measure and mark the center point. Next, measure and mark four additional lines 1/8” from the center point on each side, for a total of nine scores. Pierce stitching holes 1/2" from the top and bottom edges at each score line with a paper piercing tool and cork board.

6. Start by stitching the Red Signature at the center point. Stitch one of the 6-page signatures on either side of the center signature. Stitch three of the fold out page signatures on each side of the 6-page signatures. Finally score and fold the purple cardstock at the outer most signatures. 


You will notice that once your “purse” is folded up the pages fit into the natural slope of the front and back covers.

7.  Glue the pages into the center of the base of your purse book and let it dry completely.


8.  Once the book page insert has dried, you may finish off the book by embellishing the covers, adding a fiber or ribbon for a handle and a bit of Velcro under the flap for a closure.


And now you have created your very own little Purse Mini Book!

Keep in mind that this basic concept can be adapted to create larger books by simply increasing the measurements as desired. These are always a bit hit and make perfect gifts for all sorts of occasions!

Roni Johnson
http://inkstainswithroni.blogspot.com/

Wednesday, October 24, 2012

Introducing: Megan Elizabeth!


Hello Everyone,

My name is Megan Elizabeth, and I am so very excited and thankful to be sharing this video with you today.  Working with the Club Scrap team has been awesome, and I am absolutely certain you are going to love everything included in this month’s Peacock kit--I know I do! 

One of the new things Club Scrap included in the Peacock JR Kit is a package of my Chipboard Alpha Stickers in White Cloud. These stickers are so very fun for creating beautiful and totally customized projects. The beautifully shiny coating on this white alphabet is a perfect match for the shiny coating on the Peacock-inspired papers and embellishments this kit has to offer.

The beauty of these stickers is that you can custom-color them with your favorite inks, embossing powders, glitters and more. The secret is to make sure you use a heat-tool to “set” any customization mediums…and it will be the perfect!

I created this little video sharing two easy-peasy projects that really allow this paper to speak for itself. The colors are brilliant, and the shiny texture is just right, so please enjoy creating along with me.


I can't wait to see all the projects and ideas you create with this fantastic JR kit and how these Peacock feathers inspire you!

I hope to join you again soon at ClubScrap.com for more fun and creativity very soon.

Enjoy the Moments!
Megan Elizabeth

A little about Megan:

Megan Elizabeth is the founder and creator of www.AboveRubiesStudio.com, with a best-selling line of fun and educational how to DVDs. Megan loves to inspire fellow crafters to create simple and meaningful projects in everyday paper crafting and to always Enjoy the Moments! Megan has a popular line of unique products including the award-winning Paper Layerz die-cuttable paper and simple and different embellishments that “bling-up” any project. She's a mother of two small children and loves to spend free time walking around her favorite craft stores with a latte and getting her favorite pretty paper out to be inspired and create everyday.  

Friday, October 12, 2012

Peacock Pinspiration


So. I went to Pinterest to check an image on one of my boards. . .

An hour later.

Grrrr!

I can't say my visit was entirely unproductive. I found a cute and simple card by Beate Johns that uses a scoring tool to make a pretty border. . .


And then this nifty pop-up card posted by an innovative gal from Norway. . .

Idea #1 + Idea #2 = this fun card made with Club Scrap's colorful Peacock collection.


For the font of the card, I stamped a 4x5.25" white panel and then scored the perimeter at 1/4" and 3/8".

The cutting diagram for the inner pop-up was shared on Bente Arstad's blog, but it was in centimeters. (If only we used centimeters in America---so much easier to do things in multiples of ten, but I digress.) I used a metric to inches conversion chart to figure out how to do the cutting and scoring and spent a few wasted moments trying to decide if I really should put 1-37/64" on my new diagram. Uh, no.

Here's my Americanized convoluted version:

After cutting and scoring, I figured out the folds. Go ahead and do that.

You'll need a 5-1/2x8-1/2" piece for the base of your card. If you nest the pop-up mechanism into the folded card base, you'll find that the mechanism is just a little too big. So, here's what I did to solve that. I put that puppy into the trimmer and shaved off 1/8" from all four sides. I would have started out that way and changed the diagram, but I didn't want to take away from the experience.

Finally, I measured all of the flat surfaces of the pop-up and cut panels to fit. These were the measurements of those panels, in case you were wondering.

(2) 1-1/8x5" Green Panels
(4) 1-1/4x5/8" Purple Panels
(4) 1-1/4x5/8" Blue Panels
(2) 2x3-1/4" White Panels

Stamp and decorate those panels before you install them on the pop-up mechanism. Then, attach only the outer edges of the mechanism to the edges of the card.

Open. Close. Open. Close. Go show someone the awesome card you just made!

Friday, October 5, 2012

Using Digital Elements - How to Snip a Clip!

Happy Friday! Ron here with another digital tutorial. This one is the result of a request from my good friend and CS Member, Julie Heyer! Julie and I were chatting the other day and she said, "You know what I'd like to see a tutorial on? How do you make something like a paper clip look like it's attached to a photo or something in an digital layout?" So that's what I'm going to show you today - how to 'snip a clip' - well, at least I'm going to show you how I do it - as with most things digi, there are usually a few different ways to accomplish things!

This technique works great for layouts (as illustrated in the tutorial below), but it's great on cards, too! Use it to 'attach' your sentiment to a fiber or other parts on the front or your card! And since Saturday is World Cardmaking Day, check out these other posts on digital and hybrid cardmaking: Digital Greetings & Facebook and Digital Card Trick. Okay, on to the tutorial...

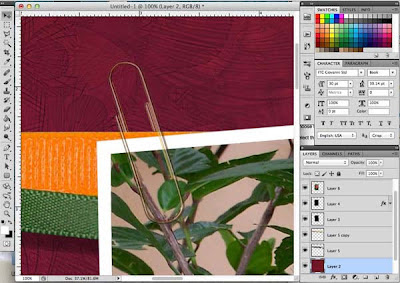
1. Start your layout as you normally would - I've got a layout with a background and some fibers (from October's Peacock kit - the fibers have been recolored), and I've added a photo.

2. Add your paper clip in a new layer.

3. Position the clip so that it's where you want it in the final layout - I've place mine (this one is from Club Scrap's Apothecary Kit) in the upper left corner of the photo, at a slight angle so that it will be clipping the photo to the orange fiber.

4. Select the clip layer and lower the opacity so that you can still see the paper clip, but you can also see the fiber and photo 'through' the clip. Around 50% should work, but your setting may vary based on the elements that you're using. Lowering the opacity helps you see where you need to snip the part of the paper clip that will be behind the fiber.

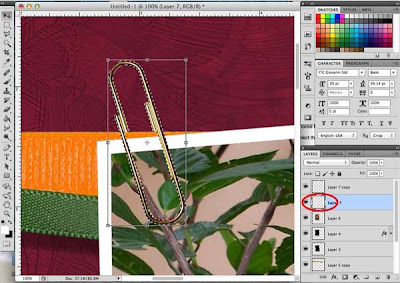
5. Decide which part of the clip you want to erase - I'm going to remove the inner part of the paper clip.

6. Choose the Polygonal Lasso Tool from the tool bar.

7. Select the part of the clip to remove (it may help to magnify that portion of the layout so that you can more easily select the right part).

8. Press the Delete key.

9. Raise the opacity of the clip layer back up to 100%.

10. Duplicate the clip layer.

11. Click on the thumbnail of the original clip layer (the lower one) while holding down the CTRL (Windows) or Command (Mac) key. This will select the just the object in the layer.

12. Use the Fill command (Shift-F5) and select Black. This will make the lower clip black in color.
 
Next, we'll turn this onto a drop shadow for the clip.

13. Click and hold the lower center handle of the graphic and drag down slightly. Then click and drag the upper center handle and drag down a bit as well.

14. From the Edit menu, select Transform -> Skew.

15. Click and hold the lower center handle of the graphic and drag to the right slightly.

16. From the Filter menu, select Blur -> Gaussian Blur.

17. Choose a setting around 3. Tip: The closer the object is to the background it's near, the lower the setting should be. If an item is floating farther away from the background, choose a higher setting.

18. Reduce the opacity of the shadow layer. This is very subjective - the closer an item is to the background, the darker the shadow usually is.  Pay attention to objects in real life and see how dark or light certain shadows look to get a feel for what setting you want to use. For this example, i'm using an opacity of 47%.

We're almost done! just one last thing to do!

19. Select the polygonal  Lasso Tool and select the little bit of shadow that's 'peeking' down from where you removed part of the paper clip - in real life, that part of the clip is behind the fiber and doesn't cast a shadow. Once it's selected, press the Delete key.


That's it! now you've created a layout with a photo that looks like it's paper-clipped to the fiber and it's got a realistic drop shadow to complete the effect! Not difficult at all when you know how. Just takes a few minutes and about 19 steps to accomplish!

Okay, go try it out for yourself! And if there's something else you'd like to see in a digital tutorial, just ask - post a comment her, in the digital forum in the CS Coffeehouse, or send an email to me at ronp317@mac.com. I'm always looking for blog post ideas!!