


Let's do a replay of how this went down . . .

2. Add a soft border to the opposing edge of the page with the stencil featured in the Friends kit.

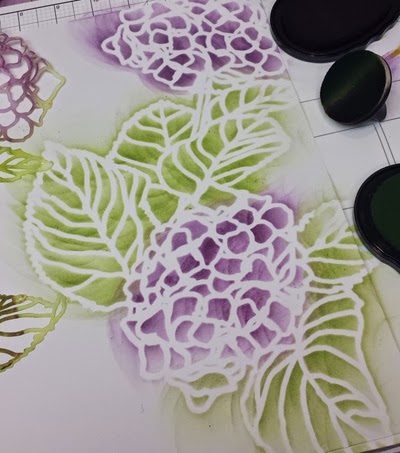
3. As long as we're at it . . . add the stencil image from the Geometrics kit, too!

4. And while the inks are out, you might as well do some stamping. I used images from the Hydrangeas and Trees collections with the same two ink colors.

5. Splatter the whole works with a gelato and extremely wet water brush.

6. Plan where you will add a photo. I chose to place the right edge of the image beneath the stenciled leaf. Use a pencil to mark the location where the edges of the matted photo meet the edge of the image.

7. Use a craft knife to cut from one marked area to the other.

8. Slide the photo into place beneath the cut edge of the leaf.

9. Add a simple page title, if you wish. The unmounted number stamps from a past Retreat kit were the perfect height.

10. Tah-dah! (Step ten is my favorite.)

Now that you've seen how it's done . . . your turn!
Oh, and Emily is not allowed to leave the house until she's thirty.
Happy Stenciling!
Tricia

So lovely, and the Stenciling is wonderful, too. this is a wonderful way to fill up that large white paper. I caught myself try to peek around the ALSBS page to see the stencil, yesterday. love these technique posts!
ReplyDeleteLove - may just have to get that now!
ReplyDeleteEmily is STUNNING! Tricia, she has grown up before our eyes...WOW!
ReplyDeleteAnd this layout is just over the top gorgeous to go along with her beautiful photo. Seriously, love all the stenciling!!
I also LOVE the tip about placing the photo mat, and then marking where the leaf needs to be cut, Brilliant!!
DeleteSo much prettier than a BIG white page =)
ReplyDeleteGorgeous page, gorgeous daughter. Where does the time go?
ReplyDeleteI don't blame you a bit, Tricia! Emily is gorgeous! I have so enjoyed watching her grow up through your layouts. And I can't wait to get my stencils~ I have bachelorette pix of my DIL from 6 years ago taken at the gardens in Manteo, NC, where the hydrangeas were spectacular. I must have had premonititions of this kit to save them for so long. yeah, that was my plan. Sure it was.
ReplyDeleteBeautiful page and a beautiful daughter. I agree with Julie, it's been watching her grow over the years of being in CS.
ReplyDeleteBeautifulladies,beautifulpage. Great stencils!!
ReplyDeleteGorgeous Tricia! And Emily is gorgeous too (we know where she gets that from!) Can't wait to try this technique on some plain white paper!
ReplyDeleteI think this is the FUNNEST page ever. So much stenciling love and layers of stampy stencily spattery goodness. Thanks for sharing!
ReplyDeleteShoot. I should rename this blog post: "Stampy Stencily Spattery Goodness!" I like that! I think it was the music on Spotify.
DeleteWow wow wow. Fabulous page and I can't believe how grown up Emily is now. Just beautiful.
ReplyDeleteWow! That is a work of art. Just beautiful!
ReplyDeleteVery pretty!
ReplyDeleteOh my goodness, Tricia. Emily is taller than you. When did that happen? Love the technique. I wanna do it. Such a beautiful collection. Love ya, Stef
ReplyDeleteBeautiful! (the daughter and the layout). I love your description of how you blocked out the world with your headphones & music and just let the materials take you there...
ReplyDelete