Showing posts with label club scrap lite. Show all posts

Monday, September 15, 2014

Blueprints Lite Layouts


Our Blueprints Lite collection is sure to find a happy home with your pictures! Let's take a look at the pre-assembled pages you can make by following our instructions . . .


Use the zero center of our grid ruler to help with placement of the three mattes in the lower right corner. It will help keep everything nicely aligned and equally spaced.

Layouts 1&2
The layout below uses one of my favorite "oldie but goodie" formulas featuring a 12x12 paper trimmed at 7" in each direction.

Layouts 3&4
The "before, during, after" cutaparts can be used with all sorts of themes. I used this pair of pages to feature an area before, during and after a snowstorm.

Layouts 5&6
The 1.5" brown ombre ribbon is soft, pliable and gorgeous.


Layouts 7&8
The Ledger Washi Tape came in handy when decorating the pages. I have all sorts of plans for the tape remaining on the roll.


I know we have quite a few newbies, so I thought it might be helpful to have a video workshop to help complete your pages. Those with more experience will likely be able to enjoy the workshop without having to press pause!


Thanks for building new memories with us . . .
Tricia

Tuesday, July 15, 2014

Oopsie Daisy Lite Pages


Here they are . . . the Oopsie Daisy Lite pages!


When I see all of the layouts that can be made with our Lite kit, I'm always reminded of its outstanding value.

Here are a few details about your new collection . . .

The Light Grey cutaparts are printed without color so you can be the artist.
Get your markers, watercolors and Gelatos ready for some fun!
We included a pack of Dazzles flower stickers . . . they pack a real punch despite their wee size.
After a little detail cutting with the Lt. Grey cutaparts, you'll have all sorts of cute mini file folders.
Cut around the petals on the 12x12 Caramel Print with a craft knife and slide a photo matte beneath.
There's a 10-pack of heavy weight black tags included in the kit.
Top them with the little flower stickers, and you've got yourself a sweet embellishment.
Edge the cutaparts with CS Ash ink and layer them for a great look.
Follow the easy assembly instructions, and your kit will fall together as easy as one, two, three!
If you live in the Chicago, IL, Minneapolis, MN or Newark, NJ area, join me in class at the Scrapbook Expo while we assemble this collection together. Invite your friends to experience the joy of scrapbooking the efficient way!

Tricia

Thursday, April 17, 2014

Hydrangeas Stencil, Gelatos, and Go!


We're all having fun with the Hydrangeas Lite Stencil! Tricia's beautifully stenciled layout from yesterday is a tough act to follow, but this page has a different look.

Background design created with the Hydrangeas Lite Stencil


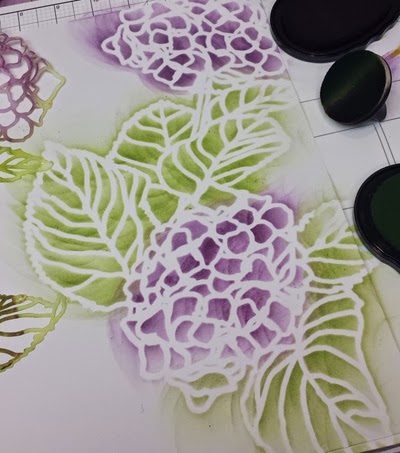
Hydrangeas Stencil and Gelatos

1. Spray Stencil with water (my stencil has been used a few times so it's a little stained).


2. Apply color from Faber-Castell Gelatos directly to the stencil.


3. Mist stencil with more water.


4. Press paper onto the stencil to transfer color.


5. Lift to reveal stencil image. Set aside to dry or use heat a tool to speed up the process.


6. Align the stencil over the image created with the gelatos. Fill in the image with an ink applicator and CS inks.


7. Conceal any imperfections by adding color splatters with Gelatos and a water brush. It's one of those "perfect imperfection" things that adds so much!


8. Add a single matted photo to the page and finish with a stamped sentiment and ribbon. (Hah. Tricia's project from yesterday required ten steps. I snuck through with only eight!)


For those of you lucky enough to be receiving the Lite collection, enjoy!
Thanks for crafting with me . . .
Kay at Club Scrap


Wednesday, April 16, 2014

Stenciled Hydrangea Decorative Paper Technique


A sheet of 12x12 White Plain paper can be a little daunting, don't you agree? This project finally developed some momentum after I donned my headphones, played a few tunes on Spotify, and stenciled the beautiful Hydrangeas image.

Let's do a replay of how this went down . . .

1. Use CS Leaf and Orchid inks and an ink applicator to stencil onto the 12x12 White Plain.


2. Add a soft border to the opposing edge of the page with the stencil featured in the Friends kit.


3. As long as we're at it . . . add the stencil image from the Geometrics kit, too!


4. And while the inks are out, you might as well do some stamping. I used images from the Hydrangeas and Trees collections with the same two ink colors.


5. Splatter the whole works with a gelato and extremely wet water brush.


6. Plan where you will add a photo. I chose to place the right edge of the image beneath the stenciled leaf. Use a pencil to mark the location where the edges of the matted photo meet the edge of the image.


7. Use a craft knife to cut from one marked area to the other.


8. Slide the photo into place beneath the cut edge of the leaf.


9. Add a simple page title, if you wish. The unmounted number stamps from a past Retreat kit were the perfect height.


10. Tah-dah! (Step ten is my favorite.)


Now that you've seen how it's done . . . your turn!

Oh, and Emily is not allowed to leave the house until she's thirty.

Happy Stenciling!
Tricia
Tuesday, March 18, 2014

Trees Bottle Cap Bonanza


Now that the Trees Lite kit is on its way to you, it's time to explore the Burlap Bottle Caps and Epoxy Dots goodie!
Bottle Cap Accordion
Take Wing Art Nouveau Stamp with Bottle Cap Goodie
Bottle Cap Page Embellishment

1. Use a 1" punch to create artwork for the center of the bottle cap. It can be filled with stamped art, pre-printed cutaparts, photos, ticket stubs or anything your heart desires. Attach the artwork to the cap with double-sided adhesive.


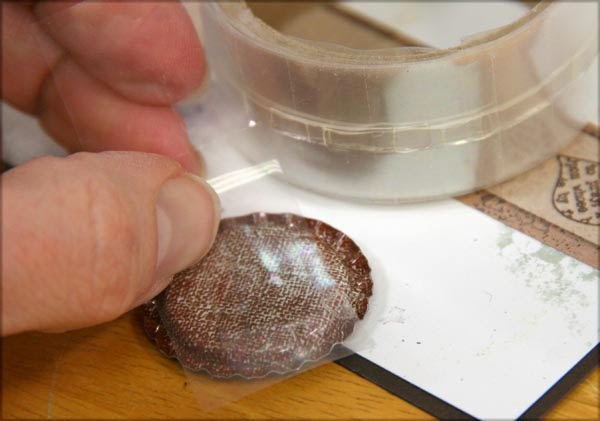
2. Place the self adhesive sticker on top of the artwork.


3. Attach the cap to your project with a Glue Line.


4. Anchor the bottle caps with a few green hand cut leaves and layer onto a page with the 12" Beige cutaparts.

Trees Lite White Print 12x12 Scrapbook Layout
Bottle Cap Accordion

1. Cut the "magnificent" 1.25" strip from Trees Beige Cutapart (or if you'll use it in the ALSB, select other paper).


2. Trim the strip to 7-1/2".


3. Score every 1.25" and fold along the score lines to create an accordion.


4. Use the 1/2" setting on a Corner Chomper to round all corners of the little accordion. Open the folds if you are unable to punch through all of the layers at once.


5. Decorate the mini accordion with rubber stamped images and photos.


6. Prepare two decorated bottle caps to be used as covers for the mini book.


7. Apply adhesive to back of each cover and attach to the accordion.


8. Fold to press together. How cute is that?


Thank you for exploring the Trees Bottle Cap goodie with me. 

Enjoy!
Kay at Club Scrap