Showing posts with label Papillon. Show all posts

Monday, October 21, 2013

Getting Grungy with Pattern Basics

Good Monday Morning everyone,

ATC's using Pattern Basics Brights Notebook paper
If you are looking for a way to create those totally cool and hip grungy looking ATC's (Artist Trading Cards) or tags that are so popular today, but don't have the time or energy to make them using all those fancy inking techniques, then why not try letting your Pattern Basics papers do the work for you? I picked up a couple of the scraps of brights notebook paper I had left over from some of my layouts and simply inked the edges and stamped.
ATC Close up
How easy was that?! They look like I spent days on them, but in reality it only took me an hour to cut the base papers, trim the notebook Pattern Basics papers, tear some handmade Evergreen papers and attach the assorted embellishments.

I used Club Scrap's Hybrid Inks in Tangerine, Spruce, and Earth for stamping the Memoirs, Papillon, and Centennial Classic UM images.

So get out your favorite flavor of Pattern Basics and make your own grungy creation.

Never got any from GHM, you can order some up for yourself HERE

Thanks for stopping by and have a great week! 


Julie

Monday, September 23, 2013

Video Inspired Cards!

Good Monday Morning everyone!

Take Wing Card 
I am sure you are saying to yourself, "this card sure looks familiar", well, that is because it should. Ron and Kay both created similar cards using completely different techniques. Inspired by Ron Perry's blog post last Thursday, I set out to create my own version. Check out Ron's excellent video tutorial HERE!

Here are the steps I took to create my Take Wing Digital Hybrid Cards.

Use Photoshop Elements to create a panel for your card,
while following along with Ron's video tutorial.
Print out your 4x5.25" panels on one sheet of 8.5x11" sticker paper.
Trim down your panels and choose 2 sheets of coordinating 8.5x11" cardstocks for card bases.
Purple and Shimmer Blue cardstocks shown from 2011 Papillon kit.
Ink edges of panels.  Score each 8.5x11" cardstock vertically at 4.25".
Then trim each sheet horizontally at 5.5" creating your 4 card bases.
Peel backing from sticker paper panels and adhere to card bases.
4 completed cards... almost...
...add a little extra bling using 2013 Spring Chorus rhinestones embellishments.
Completed Take Wing Digital Hybrid Card
Hope you enjoyed my version of this fun card and special thanks to Kay and Ron for providing the inspiration. Have a great week! 


Julie

Monday, September 16, 2013

Let's Take A Walk

Good Monday Morning Everyone!
Let's take a walk.

Last Wednesday night was another fun Scrapbook Pajama Party hosted by the talented Tiare of iClassygirl.com. She posted a sketch for us to follow and I created my layout based on her ideas and that sketch. 

Check out this LINK for more details on the sketch and on how to watch the recorded show.

Here are the steps to complete the layout.
Choose papers from the Patterned Brights collection,
two 4x6 dk. gray photo mats and a 12x12 blue cardstock from the Serenity kit.
Print out butterfly collage stamp from the Papillon digital kit.
Color with water brush and coordinating metallic Gelatos.
Detail of the painted butterfly.
Fussy cut your butterfly and "ink" the edges using a brush tip black marker.
I love these butterflies!  
Baby snapping turtle
The back story of my layout:
My niece, daughter and I took a walk last weekend around the cranberry bog and pond by my home. We were amazed to find this tiny snapping turtle on the dirt road path around the bog.  My niece is a turtle lover and was just captivated by this little one. We decided to make his journey to the pond a little shorter by giving him a lift. What an amazing experience.

Other supplies used in this layout:
Thickers from Club Scrap 2010 Jubilee kit
Recollections rhinestones
Black cat's eye chalk ink by Colorbox
Uniball Signo white journaling pen

Thanks for stopping by and hope you have a great week!


Julie

Monday, June 17, 2013

Framed Butterfly

Good Morning Friends,

I am excited to share this little project with you today.

It all started with this inspiration piece,  a small framed home decor item found in a thrift store in Florida.

My Mom brought me to this tiny shop full of all sorts of unique gifts and thrift items.   I took a photo of this framed butterfly and just knew I could recreate it myself.    My trip to Florida was in November 2011 and I have been sitting on this idea for some time.


The seed was planted, it just took 2 years for it to grow into this.

Step 1.  I used iScrapbook digital scrapbooking software for Macs to make a contact sheet of 8 images of the Butterfly Collage Stamp from the CS® Papillon Digital kit.  I printed it out on an 8.5 x 11 sheet of white cardstock using a toner ink printer.


Step 2. Using Perfect Pearls and a little water to create a paint, I added shimmery color to the butterflies with a paintbrush. I tested out some color combinations on plain copy paper first and then added the chosen colors or pink, purple and blue to five of the butterflies. On the very first image, I added green and pearl to the torn leaf paper and sheet music images. I also added a touch of bronze to the sheet music to give it some shadowing affects. This is the base image that the butterflies would be added to for the layered dimensional affect.


Step 3.  Fussy cut  4 of the butterflies out of the sheet.


Step 4.  I mounted the base image of the collage digi stamp and matted with CS® Memoirs green and CS® Papillon purple cardstocks. I inked the edges of all of the layers of cardstock with black india ink.   Used a black broad tipped brush marker to "ink" the edges of the butterflies.   The brush tip helps get into the tight spaces and covers the white edges to give them a cleaner look.


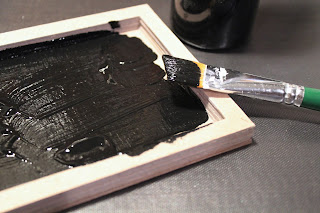
Step 5.  Had cut several frames from chip board and had a stack of about six .5 inch wide frames all ready to go.  Used CS® Bookbinding Glue to attach them all together.   Then glued them onto a thicker piece of matte board cut to the same dimensions 4.25 x 6.25 inches.    Once dried,  I painted the whole piece with Dick Blick Black Matte Paint and set aside to dry.

Step 6.  Once dry,  I attached the first matted collage image to the bottom of the shadow box frame with double sided ATG adhesive.

Step 7.  Use black foam dimensional squares to create the butterfly stack.


Step 8.   Using more of the same dimensional adhesive squares,  I attached the butterfly stack to the matted collage.


Step 9.  Enjoy the finished project. I am so happy with how it came out!


I really hope you enjoyed this little home decor project.

Thanks for stopping by!

Julie Heyer