Showing posts with label Autumn Garden. Show all posts

Monday, November 25, 2013

Autumn Album

Good Monday Morning Everyone!! 

As I was browsing Pinterest one day, I ran across a stunning Autumn card. I knew I wanted to recreate it using my Club Scrap supplies. Here are the steps I took in recreating this card to make an Autumnal cover for a handmade album. Having been around for a while, you'll see that some of my materials are a blast from the past. Do you have them, too?

Autumn Album
Find a seed packet template online and customize using iScrapbook software.
Print it out on copy paper in black and white.
Use the Autumn Garden stamp and stencil to create a focal image on the front of the seed packet.
The Just Dandy leaf and Take Wing swirl stamp worked nicely with the pumpkins image.
Cut small rectangles on canvas from the Versailles kit and color using Peeled Paint Distress stain.
Stencil the word Autumn onto sticker paper. Fussy cut and adhere to canvas flags.
Create the album using the Wildflowers Stamp kit project as a guide.
My album used book board cover pieces that are 9x9" square. It used a total of 3 spine pieces. Two .75x9" and one 2x9". Use five 12x12 sheets of cardstock from the October 2006 Farmer's Market kit. 4 Pumpkin orange sheets for the inside and outside covers and 1 Dark brown sheet for the inside and outside spine. Holes are punched in the .75x9" spine pieces for binding.
Use clear brown pony beads for the spacers.
The inside pages are 8.5x11" cardstock from the same kit.  Pick 2 sheets of 3 different colors and score them at 1" and 2" from one of the short sides. Punch holes to coincide with the spines holes for binding. Run a line of ATG double sided tape  along the edge of the first scored area. 
Fold on the 1"score line and adhere to create a double thickness of cardstock.
Use six 8.5 x 11" sheets of the Farmer's Market paper 2 each of 3 different colors cut horizontally at 8.25" to cover the back sides of each page. 
Die cut leaves from Lodge, Memoirs, and Scholarship cardstocks using Sizzix Tattered Leaves.  *Note: Memoirs green and Scholarship tan cardstocks inked with Peeled Paint and Wild Honey Distress Stains. Stitch a sheet of Farmer's Market green cardstock cut at 7.75" square to a sheet of 8.5" square canvas. Adhere a torn and inked paper doily to the green cardstock and attach the remaining embellishments using hot glue.

I always enjoy admiring and being inspired by what others have created and then giving their creations my own Club Scrap twist.  Hoping you will give it a try too.

Thanks so much for stopping by and have a great week.


Julie

Thursday, November 22, 2012

Happy Thanksgiving!


Since it is a day of thanks, I thought I'd take a moment today and share what I'm thankful for.

I'm most thankful for my family and friends - although my biological family is fairly small, I'm lucky enough to have an extended family of dear, dear friends. My DSO David, my BFF Sharon, Cherryl & my Wisconsin family - The Carney's and the Morris's - I can't imagine my life without all of these people.  And then there's my CS family, my co-workers (who are also friends!) and so many more special people in my life - I thank God for all of them each and every day.

I'm also thankful for my health. I've had quite a few health problems over the years (including a few cancer diagnoses), but I'm still here to talk about it all and I feel great, so for that, I'm thankful. And living with (and surviving) cancer has given me a different outlook on life - I'm very grateful for that.

I'm thankful for my life - it's far from perfect, but pretty neat all the same! As I write this, I realize that I could go on and on about things that I'm thankful for, but family, friends and my health - those are the most important ones, so I'll leave it at that.

Take a moment and give thanks for the wonderful things in your life - today and every day.

Creatively and thankfully yours,

Ron

Friday, October 26, 2012

I've Uncorked My Autumn Garden

Autumn Greetings from Kay here at Club Scrap.
I've had the pleasure of making a few little projects with the new Uncorked and Autumn Garden collections and thought I'd share.


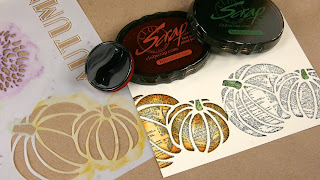
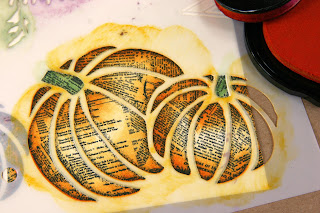
First, the Autumn Garden Unmounted Stamps and Stencil. Oh, boy, this is a fun one!!! The pumpkin UM and the pumpkin stencil images are sized to work perfectly together! Check it out.

First the rubber stamped pumpkins,

now the stenciling right over the rubber stamped pumpkins.

So cool how they work together to create this artistic look!


While I was having so much fun with the stencil, I added a little black marker to the stenciled letters.

I say, let the fun continue!!!
Now about the mum on the stencil.


I started by adding a thin coat of white acrylic paint onto a text print.

Then stenciled the mums onto the paper with a foam brush and acrylic paint.

If you use a rag to apply paint to the stencil, it creates a softer look. 

Then I added a few finishing touches.


And let the fun continue!!
I'm so glad we finally got to pop the cork on this collection. Here is a BDay card I whipped up with the new Uncorked Unmounted Rubber Stamps and round kraft coaster Sticker Labels. (Those sticker labels are included in the collection!)

I couldn't resist making my wine glass half full by adding some wine to the rubber stamped glass. I used a wet brush to simply pick up the color from an ink pad. Easy!


I can imagine many stamping and stenciling techniques happening with these new items, and I didn't even break into my stash of beautiful papers in the Uncorked and Autumn Garden collections! That's next . . .

Thanks for looking, and enjoy our new collections!
Kay of Club Scrap