Showing posts with label Love Blooms. Show all posts

Friday, January 31, 2014

Gearing Up for Valentine's Day

Valentine's Day is right around the corner!


In preparation, I've pulled out my Love Blooms and Love Bites stamps to help create this Valentine Luminary. By the way, if you don't already have these stamps, you'll LOVE the price they are right now!

Love Blooms
Love Bites
Valentine Luminary:


Decorating the luminary was really the final touch. Here's what happened before the rubber stamping began . . .

1. Cut cardstock to 6x12" and score at 2-3/4, 5-1/2, 8-1/4, 11".


2. Add stencil shapes to the scored paper so they overlap the first and third score lines.


3. Use a craft knife to cut along the edge of the stenciled shape that extends past the score line.


3. Stamp and mist to decorate. Fold on score lines and round corners, if desired. Use adhesive or glue to attach the 1" tab, creating an open rectangle. Place luminary over battery-operated votive. Hit the lights. Instant romance. :)


The luminary will fold flat for easy storage after Valentine's Day. Make one for the next season!

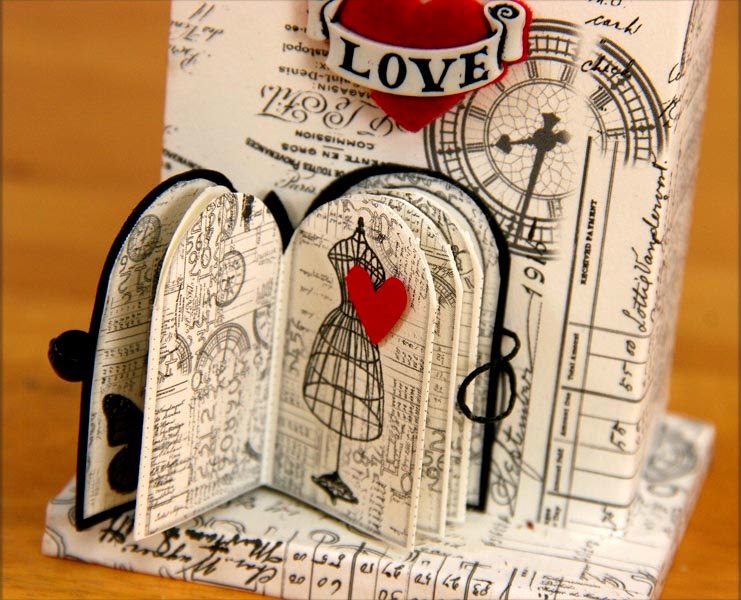
While in the Valentine decorating spirit, I gave these Clock Tower projects a little extra "love" to use as a love shack Valentine gift. I'll let the pictures do the talkin'!

Make garland with waxed linen thread and tiny punched hearts.

Small and Large Clock Tower Project

Little touches of red hearts go a long way
Retreat 2013 Time Of Your Life Unmounted Rubber Stamp Quote
Clock Mechanism hidden in the back
Have fun with your Valentine crafts! No matter how you express it, it's always fun to share the love!

Thank you for stopping by,
Kay at Club Scrap

Saturday, January 25, 2014

Love is in the air.

Can you believe Valentine's Day is just around the corner? Need some incentive to get started on your Valentines? We have two stamp sheets that are perfect for your cards, and as luck would have it, they're 50% off through Monday!

The 2013 Love Bites UM sheet features a fun, flirty, and dare I say, snarky take on Valentine's Day.


 Here are some fun cards using the Love Bites UM. To view more cards, and Tricia's original blog post, click HERE.


The 2012 Love Blooms stamps are a more traditional way to express your love. I've always really liked the "faux postage" feel of the artwork, too!


Here are a couple of cards featuring these lovely stamps:


For more details on how the Love Blooms cards were made, click HERE.

I hope this inspires you to get creative. Now I gotta go get started on MY Valentines! Happy Saturday!

Creatively yours,
Karen


Tuesday, December 4, 2012

Santa's Belt Gift Card Holder

Hey, Holiday Crafters!

Planning to give some gift cards this year? As a paper crafter, if you plan to give them, thou shalt not use a lame, white, undecorated envelope! Heavens, no!

I was "Pinspired" one day and adapted a cute gift card holder project into a new cutting formula. The "belly band" that holds it all together reminded me of Santa's belt and was the inspiration for my color choices. But you could certainly take this in any direction, depending on the season.

You'll need:
8.5x11 Red
8.5x11 White
8.5x11 Black
2012 WOW Holiday Rubber Stamps
12" Paper Trimmer
CS® Grid Ruler, Craft Knife and Cutting Mat
Scoring Tool and Bone Folder
Cutting Direction-following Skills
Gift Card

1. Trim each 8.5x11 vertically at 8, 7 and 4.25".

2. Cut each 2.75x11 horizontally at 10.75, 9.75, 8.5, 6, and 3.5".

3. Trim each 1.25x2.75 horizontally at 1.5".

4. Trim each 1x2.75 horizontally at 1.75".

5. Cut each 1x11 and .5x11 horizontally at 8". (Wowza. That's a big 'ole pile of pieces! Any piece marked with an "x" in the diagram will not be used.)

6. Score each 4.25x11 vertically at 3.25". Rotate the pieces horizontally with the score at the top. Score at 4 and 8".

7. Use a ruler, craft knife and cutting mat to remove the 1x7" scored area from each piece, as indicated on the diagram. Fold up the 1" flap and secure with narrow tape to create a pocket.


8. Interchange the paper colors, and nest the 2.75x3.5 and 2.5x2.5" mattes onto the card holder.


9. Nest the .5x8 strip onto the 1x8" strip and adhere at just one end. (If you secure the other ends before wrapping the band around the gift card holder, the band will not fit properly.)

10. Wrap the nested band around the card holder to create the "belt" and secure at the other end. Position the pre-secured end of the band at front and center so that the seam will be covered.

11. Nest the 1x1" square onto the 1.25x1.25" square and place on the seam of the belt. Interchange the colors as you like!

Not giving gift cards for Christmas? Check out these other styles:

This one was created with Navajo Greeting and Love Blooms Unmounted Stamps:


And this one uses Uncorked and Retreat 2012 unmounted stamps, plus a nifty Equestrian Letterpress Block.


Happy holiday (and multi-occasion) gift card giving!
Tricia