Showing posts with label Retreat Project. Show all posts

Wednesday, February 12, 2014

Metallic Marvels Ghosting Technique

Good Wednesday morning, everyone!

Community member Lori Bethke created a wonderful array of cards from the Retreat 2009 Metallic Marvels workshop. Member Debby H. was intrigued and asked about this workshop, which was before she joined the club, and has since become unavailable.

I wanted to share one of the many techniques taught during this Retreat Workshop. The one I will share with you today is called ghosting and involves the use of a rubber brayer, matte and glossy panels, and a variety of metallic re-inkers. On a side note, I am going to experiment with the Neon Dabbers and see what happens.  I promise to post pictures with my results.

Back to the tutorial.

Step 1. Squeeze out 2 pools of re-inker (copper and gold) onto your glossy cardstock panel. I used a metallic green cardstock from the Raku collection. Using the rubber brayer, roll the ink out onto the panel using a bouncy type motion until the entire panel is covered.

Step 2. Use a stamp, press down into the wet inks, and slide the stamp to create the ghost. Please note, you are only sliding the stamp over about an 1/8 of an inch or so. It creates a drop shadow effect, very cool!
Watercolor Blossom stamp on inked Raku Metallic Green cardstock.
Ghosting on Glossy White cardstock with Aspen leaf stamp
Ghosting on Raku Metallic Green cardstock with Aspen leaf stamp
Step 3. Use the same stamp, still wet with the ink from the ghosting technique and stamp onto white cardstock to create even more art panels.


Step 4. Trim out your art panels to use on your cards.


Bonus Technique:

Step 1. Use the wet brayer from the ghosting technique to ink up a stamp.  Stamp on cardstock panel.


Step 2. Roll the brayer, used to ink the stamp, onto another piece of cardstock.  This creates the negative impression of the stamp onto the cardstock.


Step 3. Create cards using the panels.
Black cardstock stamped panel, Random Doorways Red and Yellow cardstock and Watercolor Blossoms sentiment.
Black cardstock brayer panel, Random Doorways Yellow and Cruisin' Coral cardstock, and Big Deal sentiment.

Hope you enjoyed this tutorial and maybe we will see a few of these techniques used during this week's Metallic Challenge for Assembly Line Boot Camp.

Thanks for stopping by and hope you have a great week.


Julie


Friday, January 31, 2014

Gearing Up for Valentine's Day

Valentine's Day is right around the corner!


In preparation, I've pulled out my Love Blooms and Love Bites stamps to help create this Valentine Luminary. By the way, if you don't already have these stamps, you'll LOVE the price they are right now!

Love Blooms
Love Bites
Valentine Luminary:


Decorating the luminary was really the final touch. Here's what happened before the rubber stamping began . . .

1. Cut cardstock to 6x12" and score at 2-3/4, 5-1/2, 8-1/4, 11".


2. Add stencil shapes to the scored paper so they overlap the first and third score lines.


3. Use a craft knife to cut along the edge of the stenciled shape that extends past the score line.


3. Stamp and mist to decorate. Fold on score lines and round corners, if desired. Use adhesive or glue to attach the 1" tab, creating an open rectangle. Place luminary over battery-operated votive. Hit the lights. Instant romance. :)


The luminary will fold flat for easy storage after Valentine's Day. Make one for the next season!

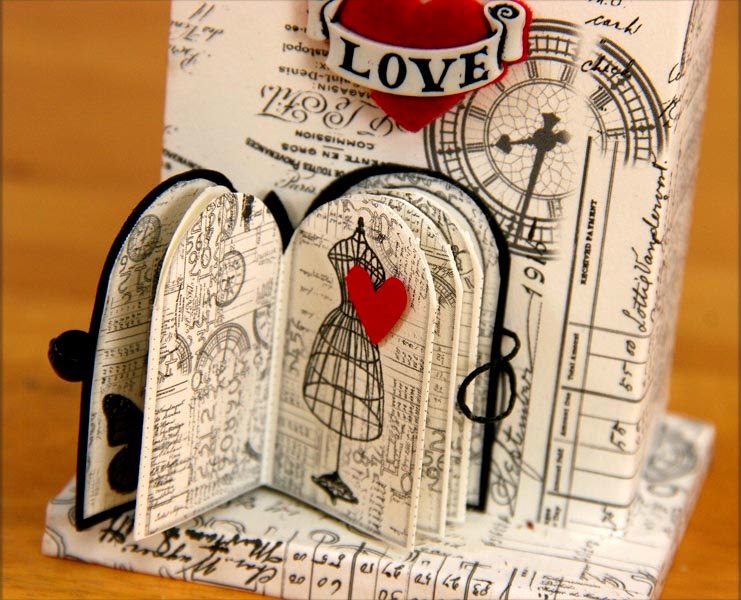
While in the Valentine decorating spirit, I gave these Clock Tower projects a little extra "love" to use as a love shack Valentine gift. I'll let the pictures do the talkin'!

Make garland with waxed linen thread and tiny punched hearts.

Small and Large Clock Tower Project

Little touches of red hearts go a long way
Retreat 2013 Time Of Your Life Unmounted Rubber Stamp Quote
Clock Mechanism hidden in the back
Have fun with your Valentine crafts! No matter how you express it, it's always fun to share the love!

Thank you for stopping by,
Kay at Club Scrap

Saturday, November 9, 2013

Retreat Week Finale Linky Party!

I hope you all enjoyed "Retreat Week"! By now you've experienced all of the amazing projects offered at the 2013 Retreat. Like what you see? Why not join us for Retreat 2014? Registration for our August and October Retreat opens today and just $25 down holds your spot . . . it's gonna be a blast!

To celebrate the finale of our Retreat Week fun, we're hosting a Linky Party!

Some personal completed Retreat/Cruise projects.
The Club Scrap team shared their finished projects over the past week, so now it's your turn to share YOUR finished Retreat projects. Aw, heck, let's include Anniversary Cruise/CIAB (Cruise in a Box) and WOW (Weekend of Workshops) projects, too! Each photo linked to this post will earn you a chance at some awesome blog candy, so feel free to share as many finished pics as you like.

Linking is easy! Click HERE if you need a quick review. Projects linked on or before Saturday, November 23 will qualify for a random prize drawing for goodies from Club Scrap.


Let the fun begin!

Creatively yours,
Karen

Wednesday, November 6, 2013

Desktop Organizer--A Place for Everything!

Happy Wednesday!

I had the pleasure of teaching a second workshop at Retreat this year: The Desktop Organizer. I just LOVE this project! I'm the kinda person that needs to SEE what I have to remember to use it. The Desktop Organizer allows me to do just that, put everything out right where I can see it. (Of course, I have a lot of "stuff", so just one organizer wasn't going to quite do it for me.)

This idea was first sparked by an idea shared by Club Scrap member, Lynn Mathers. In the hands of our Design Team, the idea eventually morphed into this amazing way to store your tools and supplies.

Classroom version.
The original "classroom" Organizer features ten individual compartments; nine that are about 3x3" in size and one in the rear sized to fit your 8x8" Grid Ruler perfectly! It also includes optional inner dividers, perfect for keeping your pens, markers, Gelatos stored upright. 

Ink storage variation in background.
The Ink Storage variation has the same ten compartments, but instead of inner dividers, it features risers to create custom storage for your CS Hybrid Ink Pads, Re-inkers and Ink Applicators.

I really like projects that are fun to create, but it's great to have the added bonus of something that is totally functional as well. Pretty and useful? SCORE!

If you love what you've seen here on the blog this week, there are still just a couple of Retreat in a Boxes left in our online shop if you "have to have it all". You can also check out individual Retreat projects and products that will go live in our online store on Monday. Stay tuned!

Creatively yours,
Karen

Tuesday, November 5, 2013

Stationer's Box Workshop

I had a blast teaching the two-part Stationer's Box Workshop. The idea was to spend the first portion experimenting with our new line of Neon Dabbers and Neon Ink Pads with the ultimate goal of making card panels for the nifty handmade gift box we'd make in round two.


How rare it is to have time to simply experiment and play! And play, we did. 


Results of just some of my play time . . . 


Then, making the gift box provided a practical way to showcase our creativity. I love how the materials for this project come from sheets of paper measuring 12" or smaller, making it very duplicatable with items from your stash. Even though the window in the box was a bit of a project, it gives it such a nice finishing touch.


Jac really "heard me" when I explained what I was looking for on the sheet of unmounted stamps we designed for this workshop. The images and colors complemented so well. We call it "Neon Doodles." The solid circles all fit into the open design circles perfectly. Love them!


Workshop videos for the Retreat-in-a-box folks air after the chat tonight. Can't wait to have you join us!

Do some doodling today!
Tricia

Monday, November 4, 2013

2013 Retreat - Magnetic Messenger

Good Monday Morning Everyone!

It feels so good to finally be able to share one of my completed Retreat 2013 projects with all of you.

In Jacqueline Carney's class we created this fun and useful magnetic board complete with super strong magnets to hold up our most prized memorabilia and photos.

Jac working her magic with the class.
Jac and I after class. 
I want to be honest here, Jac was very clear when we began the workshop to make sure you were happy with the torn strips and their spacing. I obviously didn't plan well, as you can see by the large grouping of white papers at the top of my project. Not one to let that get in my way creatively, I took that mistake and turned it into an opportunity to embellish! It was the perfect spot to add a quote from the Nov. 2011 Tilescape collection and some paper flowers.

I punched out flowers from the small sheet of cutaparts I had left over from the workshop. I punched dark purple cardstock from the Mar. 2011 Raku collection for the largest flower and centers. I added ribbon from the May 2013 Cape Cod collection tied in a bow along with metal embellishments from my stash.

Check out GHM to see if there are any more 2013 Retreat in a Box left!
We don't want you to miss any of the RIAB fun.

Thanks for stopping by and hope you have a fantastic week!


Julie